
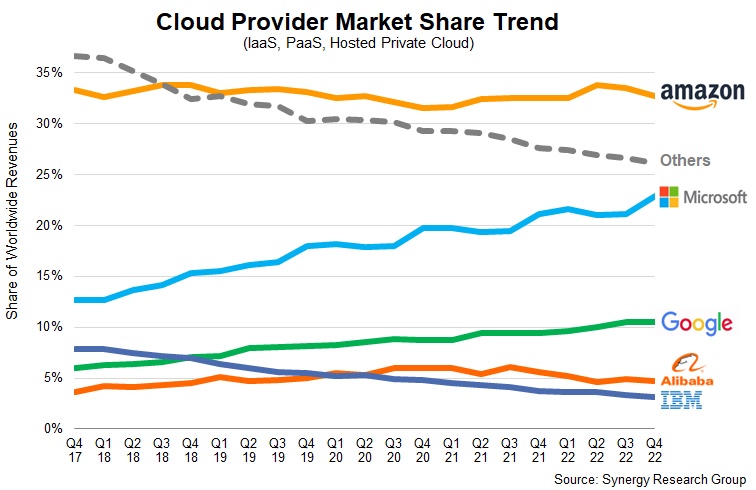
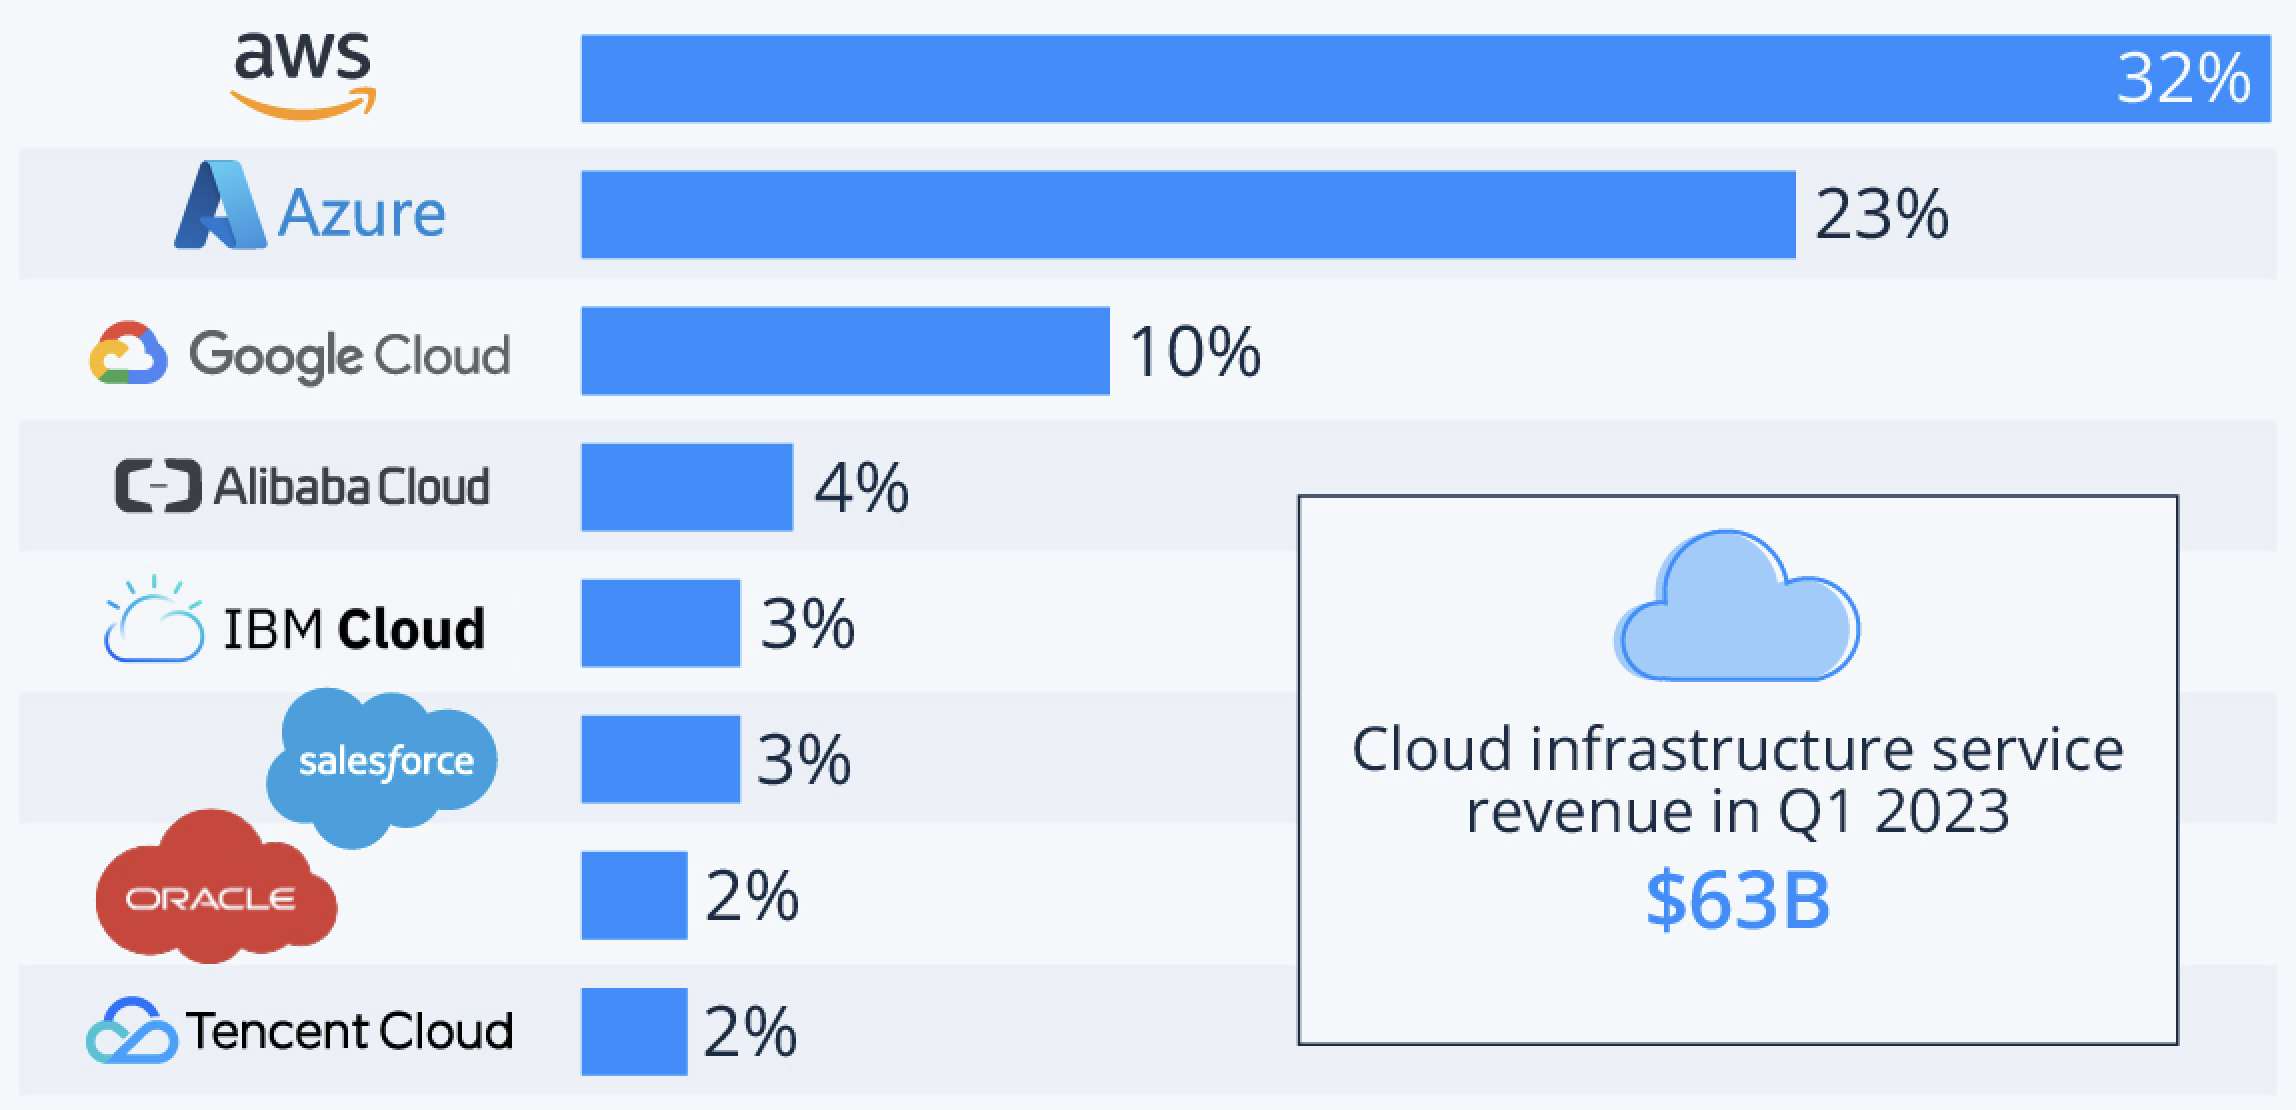
AWS has enjoyed a stable market share in the low 30 percent. Google and IBM seem to be on opposing trajectories, and Microsoft is steadily growing its market share, reaching 23% in early 2023.
Popular Cloud computing providers include services like:
- Virtual Machines: VMs allow running multiple operating systems on one physical computer. The ability to provision any virtual machine to any physical server creates hardware independence, which is appreciated if hardware fails.
- Container Registries and Container Hosting: Containers are applications inside portable, isolated environments. A container includes the necessary executables, libraries, and configuration files but does not contain operating system images, making them more lightweight and portable.
- Serverless Computing: The Cloud provider manages the allocation and provisioning of servers and runtimes, thereby eliminating infrastructure management tasks like cluster provisioning (scalability) or operating system maintenance (security). You only need to upload your code and configure what should trigger it to execute. AWS calls its serverless platform AWS-Lambda, and Microsoft calls it Azure Functions.
To learn how to choose between containers and serverless, head over to Cloudflare.
Azure Functions
Azure Function is a serverless compute service that enables user to run event-triggered code without having to provision or manage infrastructure. Being a trigger-based service, it runs a script or piece of code in response to a variety of events.
- Linux
- DOTNETCORE:7.0
- DOTNETCORE:6.0
- NODE:18-lts
- NODE:16-lts
- PYTHON:3.11
- PYTHON:3.10
- PYTHON:3.9
- PYTHON:3.8
- PHP:8.2
- PHP:8.1
- PHP:8.0
- JAVA:17-java17
- JAVA:11-java11
- JAVA:8-jre8
- JBOSSEAP:7-java11
- JBOSSEAP:7-java8
- TOMCAT:10.0-java17
- TOMCAT:10.0-java11
- TOMCAT:10.0-jre8
- TOMCAT:9.0-java17
- TOMCAT:9.0-java11
- TOMCAT:9.0-jre8
- TOMCAT:8.5-java11
- TOMCAT:8.5-jre8
- GO:1.19
- Windows
- dotnet:7
- dotnet:6
- ASPNET:V4.8
- ASPNET:V3.5
- NODE:18LTS
- NODE:16LTS
- java:1.8:Java SE:8
- java:11:Java SE:11
- java:17:Java SE:17
- java:1.8:TOMCAT:10.0
- java:11:TOMCAT:10.0
- java:17:TOMCAT:10.0
- java:1.8:TOMCAT:9.0
- java:11:TOMCAT:9.0
- java:17:TOMCAT:9.0
- java:1.8:TOMCAT:8.5
- java:11:TOMCAT:8.5
- java:17:TOMCAT:8.5
Prerequisites
Accounts
- Open your account settings (not any repo’s settings).
- Open Developer settings (bottom of the left menu).
- Open Personal Access Tokens
- Open Tokens **(classic)**
- Generate a new Token (classic)
- Provide a name, e.g. CICD
- Provide a reasonable expiration
- Check:
- repo
- workflow
- write:package
- delete:packages
- read:org
- gist
Applications
- Git: https://git-scm.com/book/en/v2/Getting-Started-Installing-Git
Windows: winget install Git.Git
Mac: git might already be installed on your Mac, if not: brew install git - Azure CLI: https://learn.microsoft.com/en-us/cli/azure/install-azure-cli
Windows: winget install -e –id Microsoft.AzureCLI
Mac: brew install azure-cli - Python 3.10 (or better): https://www.python.org/downloads/
Windows: winget install -e –id Python.Python.3.11
Mac: Should be already installed on your Mac, if not or you want 3.11: brew install [email protected] - VSCode (optional but convenient): https://code.visualstudio.com
The GUI installer apps work just fine, but if you really want to use the cli for this as well ….
Windows: winget install -e –id Microsoft.VisualStudioCode
Mac: brew install –cask visual-studio-code (downloading the installer
% git --version
git version 2.41.0
% az --version
azure-cli 2.50.0
% python3 --version
Python 3.11.4
PowerShell 7.3.6
PS C:\Users\Wolf Paulus> git --version
git version 2.41.0.windows.1
PS C:\Users\Wolf Paulus> az --version
azure-cli                         2.51.0
PS C:\Users\Wolf Paulus> python --version
Python 3.11.4
PS C:\Users\Wolf Paulus> code --version
1.79.2
Nasty side effect
If you had Python 3.11 already installed on your Windows computer, you might now find that Python 3.10 as your default interpreter. The azure-cli required Python “and installs a version for you.” Unfortunately, the azure-cli in mentions in the System PATH while a typical Python installation get only referenced in the User PATH. Long story short, if it’s bothering you that Python 3.10 is the default interpreter in you system, simply follow these steps:
- Download the Python 3.11 installer from python.org.
- Run the installer to remove the current Python 3.11 installation.
- Run the installer again,
- Check ‘Add python.exe to PATH check’
- Click ‘Customize Installation’
- On the 2nd page select: “Install Python for all users”, which will install is into C:\Program Files\Python311
- Click “Install”
- Open PowerShell and run “python –version” to verify that Python 3.11 is you default interpreter.
And so it begins
Forking and Cloning
-
- Forking the wolfpaulus/Azure-Serverless repository:
Open a web browser and log in to GitHub. Using that web browser, open https://github.com/wolfpaulus/Azure-Serverless. Click on the “Fork” button in the upper right corner of this page. Keep the Repo name as is, i.e. `Azure-Serverless`, and copy the main branch to your account. I.e., click on the green “Create fork” button. - Clone the repository to your computer:
For this step you’ll need the Personal Access Token (PAT) you created on the GitHub site earlier.
Open a terminal and navigate to a place where you keep your source code projects, like C:\Users\Wolf Paulus\VSCodeProjects and enter the following git command (insert your git user-name and PAT):git clone https://token:<PAT>@github.com/<GIT USER NAME>/Azure-Serverless
This should look something like this:
PS C:\Users\Wolf Paulus\VSCodeProjects> git clone https://token:[email protected]/wolf-edu/Azure-Serverless
Cloning into 'Azure-Serverless'...
remote: Enumerating objects: 50, done.
remote: Counting objects: 100% (50/50), done.
remote: Compressing objects: 100% (34/34), done.
remote: Total 50 (delta 13), reused 46 (delta 9), pack-reused 0
Receiving objects: 100% (50/50), 9.24 KiB | 193.00 KiB/s, done.
Resolving deltas: 100% (13/13), done.
- Open the “Azure-Serverless” directory in VSCode.
Before making changes to the source code, let us make some changes to VSCode. Install these extensions:- Python – “ms-python.python”
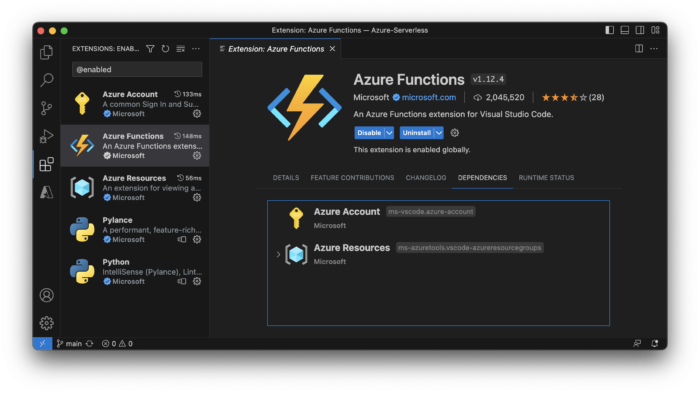
- Azure Functions – “ms-azuretools.vscode-azurefunctions”
Press F1 to open the Command Panel, search for “Auto Save” and switch it on.
- Forking the wolfpaulus/Azure-Serverless repository:
Creating Azure Resources
The Azure command-line interface (Azure CLI) is a set of commands used to create and manage Azure resources. The Azure CLI is available across Azure services and is designed to get you working quickly with Azure, with an emphasis on automation.
-
GITHUB_REPO=”…/…” # GitHub repo in format “owner/repo”. E.g., “wolf-edu/Azure-Serverless”
This is the path to your remote repository on GitHub - GITHUB_TOKEN=”ghp_…” # GitHub personal access token
Your Personal Access Token (PAT), the one you created above (in the prerequisites) - $RESOURCE_GRP=”…” # alphanumeric, underscore, parentheses, hyphen, period. E.g., “RG_FUNC_DEMO”
An Azure resource group is a container that holds related resources for an Azure solution.
Allowed characters include alphanumeric, underscore, parentheses, hyphen, and period. - $STORAGE_ACC=”…” # globally unique, lowercase alphanumeric, between 3 and 24 charactersAn Azure storage account contains all of your Azure Storage data objects: blobs, files, queues, and tables. The storage account provides a unique namespace for your Azure Storage data that’s accessible from anywhere in the world over HTTP or HTTPS. This value has to be globally unique, lowercase alphanumeric, between 3 and 24 characters. A common strategy to create globally unique names is using a domain-name you own. E.g., I would use something like “wolfpauluscom42”. You can check if a name is valid and available like so:
az storage account check-name -n <YOUR STORAGE ACCOUNT NAME>
It’s a good idea to do this before deciding and entering a name into the setup script
- $FUNCTION_NAME=”…” # globally unique, alphanumeric characters and hyphens, cannot start or end in a hyphen, and must be less than 64 chars. Valid characters are a-z (case insensitive), 0-9, and -. The function name is more than just a label, it will also appear in the URL to call your function, like here: https://func42-wolfpauluscom.azurewebsites.net/is_prime?k=17
Therefore, the function name needs to be globally unique and can contain alphanumeric characters and hyphens, cannot start or end in a hyphen, and must be less than 64 chars. Again, using a domain-name might help creating a unique name - $REGION=”eastus”
At this point, using “eastus” seems to work best, all Azure resources seem to be available there.
Each Azure region features data centers deployed within a latency-defined perimeter. List all possible locations like so:
az account list-locations - $AZURE_SUB=”Azure for Students”
The name or id of your Azure subscription
If you forgot or don’t know you Azure Subscription name, run the az login command again. The json document that is displayed after a successful login, contains the subscription name:{ "cloudName": "AzureCloud", "homeTenantId": "...", "id": "...", "isDefault": true, "managedByTenants": [], "name": "Azure for Students", "state": "Enabled", "tenantId": "...", "user": { "name": "...", "type": "user" }
Before running the setup script, modify at least the first five variable values!
On the Mac you might need to make shell scripts executable, before you can run them. I.e. run these commands in the terminal app or use the terminal inside VSCode (Ctrl `):
chmod +x ./mac/*.sh
./mac/setup.sh
On Windows Open PowerShell or use the terminal inside VSCode (Ctrl `) and run the setup script. E.g., .\windows\setup.ps1
- Resource Group
- Storage Account.
- Function App
- Application Insights
- Application Service plan
Next, the script adds a new application setting in Azure named AzureWebJobsFeatureFlags with a value of EnableWorkerIndexing, so that we can use the new Python v2 model for the function app. “The v2 programming model is designed to provide a Functions development experience that is more familiar to Python developers.” .. ohhh MicroSoft ..
Lastly, the script adds a new GitHub workflow to the remote git repository (this is the step that requires the PAT). This workflow is responsible for building the app on GitHub and deploying it into Azure, every time a repository changes … CICD, now that is impressively beautiful.
Running the setup script you should be seeing something like this:
Do you want to start the deployment process? [y/n]: y
Do you want to login to azure? An access/refresh token gets cached for sometime. But if you have not login recently, you need to do this step. [y/n]: n

Step 1: === Creating a resource group: RG_FUNC_DEMO ===
Do you want to execute this step? [y/n]: y
{
  "id": "/subscriptions/e5b7c145-2a02-4ea1-978a-ad75ad126924/resourceGroups/RG_FUNC_DEMO",
  "location": "eastus",
  "managedBy": null,
  "name": "RG_FUNC_DEMO",
  "properties": {
    "provisioningState": "Succeeded"
  },
  "tags": null,
  "type": "Microsoft.Resources/resourceGroups"
}
... done.


Step 2: === Creating a storage account: wolfpauluscom42 ===
Do you want to execute this step? [y/n]: y
The public access to all blobs or containers in the storage account will be disallowed by default in the future, which means default value for --allow-blob-public-access is still null but will be equivalent to false.
{
  "accessTier": "Hot",
  "allowBlobPublicAccess": true,
  	...
  "tags": {},
  "type": "Microsoft.Storage/storageAccounts"
}
... done.


Step 3: === Creating the serverless function as func42-wolfpauluscom ===
Do you want to execute this step? [y/n]: y
Your Linux function app 'func42-wolfpauluscom', that uses a consumption plan has been successfully created but is not active until content is published using Azure Portal or the Functions Core Tools.
Application Insights "func42-wolfpauluscom" was created for this Function App. You can visit https://portal.azure.com/#resource/subscriptions/e5b7c145-2a02-4ea1-978a-ad75ad126924/resourceGroups/RG_FUNC_DEMO/providers/microsoft.insights/components/func42-wolfpauluscom/overview to view your Application Insights component
{
  "availabilityState": "Normal",
  "clientAffinityEnabled": false,
    ...
  "vnetContentShareEnabled": false,
  "vnetImagePullEnabled": false,
  "vnetRouteAllEnabled": false
}
... done.


Step 4: === Configuring the application setting for func42-wolfpauluscom ===
Do you want to execute this step? [y/n]: y
[
  {
    "name": "FUNCTIONS_WORKER_RUNTIME",
    "slotSetting": false,
    "value": "python"
  },
  {
    "name": "FUNCTIONS_EXTENSION_VERSION",
    "slotSetting": false,
    "value": "~4"
  },
    "name": "AzureWebJobsFeatureFlags",
    "slotSetting": false,
    "value": "EnableWorkerIndexing AzureWebJobsDisableHomepage=true"
  }
]
... done.


Step 5: === Deploying the github actions for func42-wolfpauluscom ===
Do you want to execute this step? [y/n]: y
Verified GitHub repo and branch
Getting workflow template using runtime: python
Filling workflow template with name: func42-wolfpauluscom, branch: main, version: 3.11, slot: production, build_path: .
Adding publish profile to GitHub
Fetching publish profile with secrets for the app 'func42-wolfpauluscom'
Creating new workflow file: .github/workflows/main_func42-wolfpauluscom.yml
"https://github.com/wolf-edu/Azure-Serverless/actions"
... done.
Before moving on, closely obverse the script’s output and verify that everything worked as planned. Then run
git pull
in terminal to download the newly added content from the remote repository. You should see something like this:
remote: Enumerating objects: 8, done.
remote: Counting objects: 100% (8/8), done.
remote: Compressing objects: 100% (4/4), done.
remote: Total 5 (delta 1), reused 0 (delta 0), pack-reused 0
Unpacking objects: 100% (5/5), 1.22 KiB | 624.00 KiB/s, done.
From https://github.com/wolf-edu/Azure-Serverless
   1a0cd5c..e096977  main       -> origin/main
Updating 1a0cd5c..e096977
Fast-forward
 .github/workflows/main_func42-wolfpauluscom.yml | 49 +++++++++++++++++++++++
 1 file changed, 49 insertions(+)
 create mode 100644 .github/workflows/main_func42-wolfpauluscom.yml
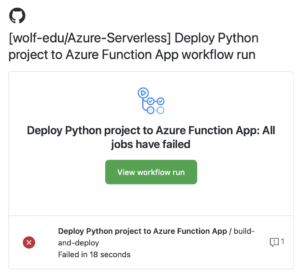
By now, you should also have received an email from GitHub, telling you that the deployment of your function has failed.
Deploying the Azure Function App
The GitHub workflow responsible for the deployment in Azure was autogenerated. The last step of out setup script did that. However, there are three environment variables that need to be changed for the deployment to succeed. Let do that next:
git pull just downloaded ./.github/workflows/main_<funcname>.yml. Open that file and change the values of the three environment variables at the top.
Set AZURE_FUNCTIONAPP_NAME to your function’s name, the package path to “./src” and the Python version to “3.11”.
E.g.:
AZURE_FUNCTIONAPP_NAME: 'func42-wolfpauluscom'
AZURE_FUNCTIONAPP_PACKAGE_PATH: './src'
PYTHON_VERSION: '3.11'
And now, finally, it’s time to commit and push the updated file to trigger test, build, and deploy.
If you have never committed anything with git before, you need to tell git your GitHub user-name and email. It’s a one-time thing, like this:
git config --global user.name "wolf-edu"
git config --global user.email "[email protected]"
Now you can add, commit, and push the updated yml file. E.g.:
git add ./.github/workflows/main_func42-wolfpauluscom.yml
git commit -m "Updated env vars with valid values"
git push
Enumerating objects: 9, done.
Counting objects: 100% (9/9), done.
Delta compression using up to 8 threads
Compressing objects: 100% (4/4), done.
Writing objects: 100% (5/5), 518 bytes | 518.00 KiB/s, done.
Total 5 (delta 2), reused 0 (delta 0), pack-reused 0
remote: Resolving deltas: 100% (2/2), completed with 2 local objects.
To https://github.com/wolf-edu/Azure-Serverless
   e096977..07e582c  main -> main
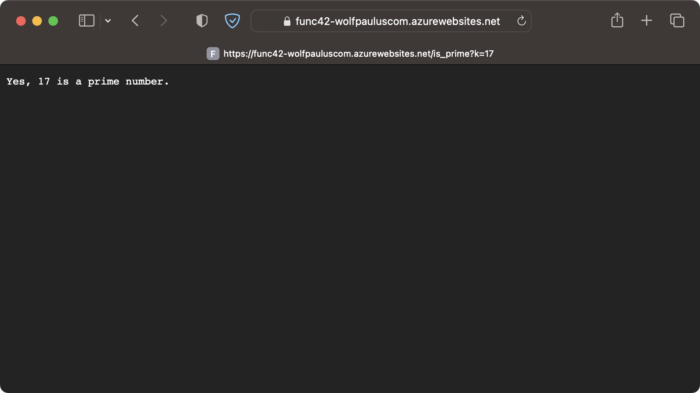
Let’s see it
The deployment takes a minute or two, but with the function name set to func42-wolfpauluscom, the URL to trigger the Azure function would be:
https://func42-wolfpauluscom.azurewebsites.net/is_prime?k=17
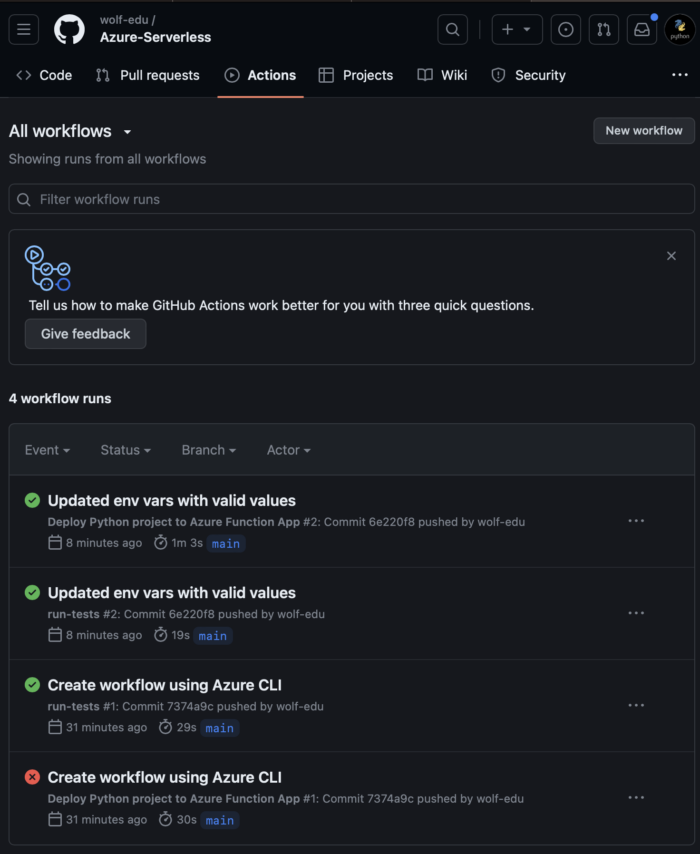
Github Actions
This is what your Github Actions should look like:
Repository Exploration

Let’s take a closer look at the repository:
.github/workflows
GitHub Actions is a continuous integration and continuous delivery (CI/CD) platform that allows you to automate your build, test, and deployment pipeline. GitHub provides Linux, Windows, and macOS virtual machines to run workflows.
The main_tests.yml workflow is triggered to run on push and pull_request events. It checks out the code, installs the dependencies declared in the requirements.txt file, and runs all tests in the ./tests directory.
The main_<funcname>.yml workflow runs after main_tests workflow completed (without errors).
It checks out the code, deploys the specified Python version, installs the dependencies, and deploys (only) the files in the ./src directory.
.venv
Virtual Environaments (venv) allow separate package installations for different projects. Using the command line a venv is created like so:
python3 -m venv ./.venv
A virtual environment needs to be “activated” using a script in its binary directory (mac: ./.venv/bin/activate Windows PS C:\> .\.venv\Scripts\Activate.ps1).
Using VSCode, open the command panel (press F1), look for “>Python: Create Environment”, and select Venv. Right there, you can also already install the dependencies.
.vscode
The vscode directory contains recommendations for extensions (extensions.json), the debugger configuration (launch.json), settings for automatically activating the venv, and unit-test settings.
mac and windows
These directories contain scripts to create and delete Azure resources.
src
The source directory contains the files that will be deployed into Azure. This folder also contains the host.json file, containing configuration options that affect all functions in a function app.
tests
The tests directory contains the pytest unit tests. All here defined tests will run on GitHub, and only if all tests pass will the next workflow be triggered. Before committing source-code, test can and should be run locally. Run tests in an already activated environment like so:
pytest
The output should look something like this:
PS C:\Users\Wolf Paulus\VSCodeProjects\Azure-Serverless> & "c:/Users/Wolf Paulus/VSCodeProjects/Azure-Serverless/.venv/Scripts/Activate.ps1"
(.venv) PS C:\Users\Wolf Paulus\VSCodeProjects\Azure-Serverless> pytest
=== test session starts ===
platform win32 -- Python 3.11.4, pytest-7.3.2, pluggy-1.0.0
rootdir: C:\Users\Wolf Paulus\VSCodeProjects\Azure-Serverless
configfile: pytest.ini
testpaths: tests
collected 3 items

tests\test_prime.py ... [100%]
=== 3 passed in 1.50s ===
(.venv) PS C:\Users\Wolf Paulus\VSCodeProjects\Azure-Serverless>
./
The .gitignore file contains file-path and file name patterns that git you ignore and pytest.ini contains informtation where pytest should look for source and test code.

Python implementation of Azure Functions
The Azure Python runtime expects the entry point to be implemented in a file named function_app.py stored at the declared AZURE_FUNCTIONAPP_PACKAGE_PATH, which in this case would be “./src”
Some tutorials have the required files at the root level of the project. However, I like to separete production (./src) from test code (./tests). This approach also makes it easier to control the files that will be deployed into Azure. I.e., only files in the ./src directory will be deployed.
./src/function_app.py
Version 2 of the Python programming model provides a decorator based approach to create functions:
import azure.functions as func
import logging

app = func.FunctionApp(http_auth_level=func.AuthLevel.ANONYMOUS)  # no api key required

@app.route(route="health")  # Route for the http endpoint
def heath_check(req: func.HttpRequest) -> func.HttpResponse:
    logging.info('health_check was called.')
    return func.HttpResponse("OK", status_code=200)
Version 2 of the Python programming model provides a decorator based approach to create functions:
The azure-functions module is mentioned in “./src/requirement.txt” and is imported here as func.
Next we initialize a variable app as a FunctionApp; this one does not require an API-key when called.
The decorarted health_check function returns an HttpResponse with the string OK and the HTTP status code 200.
The decorator accepts the route parameter, which sets the path.
I.e., this Azure function can be called like so: https://<function_name>.azurewebsites.net/<route>
The following two decorated functions show how request parameters can be accepted and how text or a JSON encoded response can be sent back.
@app.route(route="is_prime")
def foo1(req: func.HttpRequest) -> func.HttpResponse:
    logging.info('foo1 was called.')

    k = req.params.get('k')
    if not k:
        try:
            req_body = req.get_json()
            k = req_body.get('k')
        except ValueError:
            pass

    if k and k.isnumeric():
        return func.HttpResponse(is_prime(int(k))[1], status_code=200)
    else:
        return func.HttpResponse(
            "This HTTP triggered function executed successfully. Pass k=<integer> to find out if the integer is a prime number.",
            status_code=200
        )


@app.route(route="n_primes")
def foo2(req: func.HttpRequest) -> func.HttpResponse:
    logging.info('foo2 was called.')

    n = req.params.get('n')
    if not n:
        try:
            req_body = req.get_json()
            n = req_body.get('n')
        except ValueError:
            pass

    if n and n.isnumeric():
        return func.HttpResponse(body=dumps(n_primes(int(n))),
                                 status_code=200,
                                 mimetype="application/json",
                                 charset="utf-8")
    else:
        return func.HttpResponse(
            "This HTTP triggered function executed successfully. Pass a n=<integer> to get the 1st n prime numbers.",
            status_code=200
        )