Buying and using an official Arduino Board like the standard Arduino Uno is the perfect way to get started with the Arduino language, common electronic components, or your own embedded prototyping project. However, once you have mastered the initial challenges and have built some projects, the Arduino Board can get in the way.
For instance, many enthusiasts, who started out with hacking and extending the Arduino hardware and software, have now moved on to the Raspberry Pi, which is equally or even less expensive, but more powerful and complete. The Raspberry Pi comes with Ethernet, USB, HDMI, Analog-Audio-Out, a lot of memory, and much more; adding all these capabilities to the Arduino with Arduino-Shields, would probably cost several hundred Dollars. However, the Raspberry lacks some of Arduino’s I/O capabilities like Analog-Inputs.
Combining an Arduino with a Raspberry Pi, may make sense for a lot of project; but we don’t need or want to integrate an Arduino Board – the Arduino’s core, the ATMEGA Microcontroller, is all what’s needed.
We still want to program the Arduino with the familiar Arduino IDE, but the boot-loader doesn’t really help, once the ATMEGA Micro is programmed and is ready to communicate with the Raspi or any other platform.
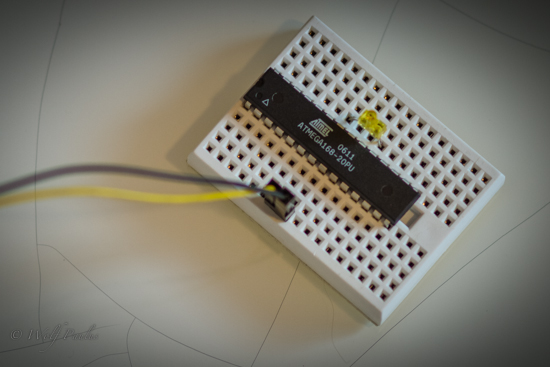
This is probably the most minimal ATmega168-20PU based Arduino you can come up with. The ATmega168 (available of about $3) was the default Arduino chip for quite some time, before being replaced by the ATmega328, doubling the available memory. The chip is powered with +5V on Pin-7 and grounded via Pin-8; the LED is between Pins 19 and 22.
Here you see it processing this rather simple blinky program:
int p = 13; // LED connected to digital pin 13
void setup() {
 pinMode(p, OUTPUT); // sets the digital pin as output
}

void loop() {
 digitalWrite(p, HIGH); // sets the LED on
 delay(100); // .. for 10th of a sec
 digitalWrite(p, LOW); // sets the LED off again
 delay(1000); // waits for a second
 digitalWrite(p, HIGH); // sets the LED on
 delay(500); // .. for 1/2 a sec
 digitalWrite(p, LOW); // sets the LED off again
 delay(500); // .. for 1/2 a second
}
Since we don’t want any bootloader (waiting for a serial upload of new software) on this chip but rather have it immediately start executing the program, we need to tell the Arduino IDE about our bare-bones board and the fact that it doesn’t have a boot loader.
Bare-Bones ATmega168 Board Definition
To add a new hardware definition to the Arduino IDE, create a hardware/BareBones folder inside your Arduino folder (the place where all your sketches are stored). Create a boards.txt file with the following content.
On the Mac for instance, I ended up with this:
/Users/wolf/Documents/Arduino/hardware/BareBones/boards.txt
minimal168.name=ATmega168 bare bone (internal 8 MHz clock)

minimal168.upload.speed=115200

minimal168.bootloader.low_fuses=0xE2

minimal168.bootloader.high_fuses=0xDD

minimal168.bootloader.extended_fuses=0×00

minimal168.upload.maximum_size=16384

minimal168.build.mcu=atmega168

minimal168.build.f_cpu=8000000L

minimal168.build.core=arduino:arduino

minimal168.build.variant=arduino:standard
Wiring up the ATmega-168
To flash the chip, we use the SPI (MOSI/MISO/SCK) Pins like shown here:
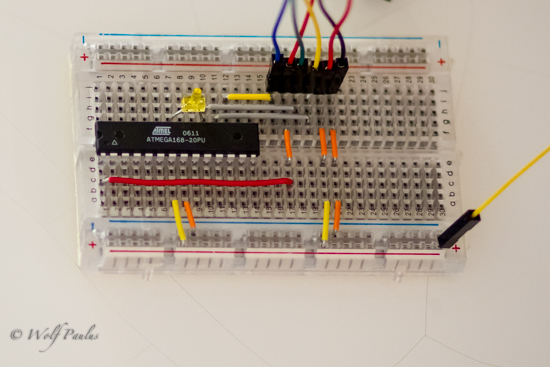
Connections from an AT-AVR-ISP2 to the ATmega-168 are as follows:
- GND -> ATmega168-Pin 8
- +5V -> ATmega168-Pin 7
- MISO -> ATmega168-Pin 18
- SCK -> ATmega168-Pin 19
- RSET -> ATmega168-Pin 1
- MOSI -> ATmega168-Pin 17
Burning without a Boot-Loader
Instead of an Arduino Board, I connected one of those shiny blue AT-AVR-ISP2 programmers from ATMEL (available for about $30) to the Mac. In the Arduino-IDE, in the Tools Menu, under Boards, I selected and ‘ATmega168 bare bone (internal 8 MHz clock)’ and under Programmers, ‘AVRISP mkII’.
Hitting ‘Upload’ will now use the AT-AVR-ISP2 to reset the chip, flash the program, and verify the new memory content. All in all, it takes about 75 seconds.
Once the chip is now powered, it will immediately start executing the program.
Switching the Internal Clock to 8MHz
Using the Fuse Calculator we can find the proper ATmega168 fuse settings, to use the internal RC Oscillator and setting it to 8Mhz.
The avrdude arguments look something like this: -U lfuse:w:0xe2:m -U hfuse:w:0xdf:m -U efuse:w:0x00:m.
Avrdude is one of the tools that the Arduino IDE deploys on your computer. You can either execute Avrdude with those arguments directly, like so:
avrdude -p m168 -b 115200 -P usb -c avrispmkII -V -e -U lfuse:w:0xe2:m -U hfuse:w:0xdf:m -U efuse:w:0x00:m
or just execute the ‘Burn Bootloader’ command in the Arduino IDE’s Tools menu.
While this will NOT burn a bootloader on the ATmege168 chip, it will set the fuses appropriately. Either way, this step needs to be performed only once.
ATtiny85
Let’s minimize the ‘Minimal Arduino’ even more, for instance by using the tiny ATtiny85 Microcontroller.
Read more: https://wolfpaulus.com/avrmc