If you have Tomcat installed on your Mac or Linux computer, like I have shown here and here, you may sooner or later want to serve content not only through HTTP, but also securely through HTTPS. Instead of going the self-signed certificate route, where the certificate is signed with its own private key, I’m describing how to acquire an SSL certificate that is signed by a certificate authority (CA) and how to configure Tomcat to use it. While not free, I gladly pay sslmate the $16, for the convenience of getting a certificate that works everywhere.
Prerequisites
Here are the things you should already have in place.
- A host and a domain name (for this example I’m going to use “alpha” and “techcasita.com”).
- Access to an email account associated with that domain (for instance [email protected]. I currently prefer Google as my registrar, which allows you to forward email to any address of your choosing.
- A user account at sslmate
- Tomcat already installed on your Mac or Linux computer
Installing sslmate
Depending on your OS, you can find detailed instructions on how to install sslmate. For Ubuntu 18.04 for instance, it’s as easy as this:
#wget -P /etc/apt/sources.list.d https://sslmate.com/apt/ubuntu1804/sslmate1.list
#wget -P /etc/apt/trusted.gpg.d https://sslmate.com/apt/ubuntu1804/sslmate.gpg
#apt-get update
#apt-get install sslmate
If this is the 1st time you are doing this, you continue with buying an certificate on your command line, like so
sslmate buy alpha.techcasita.com
otherwise, it’s a renewal process, which works very similarly:
sslmate renew alpha.techcasita.com
After a verification email containing a “validation code” is sent to [email protected], ssmate will download and store the certificates in /etc/sslmate as follows:
- Private key: alpha.techcasita.com.key
- Bare certificate: alpha.techcasita.com.crt
- Certificate chain: alpha.techcasita.com.chain.crt
- Certificate with chain: alpha.techcasita.com.chained.crt
Creating a Java Key Store
You may want to think about a strong password and for simplicity, use it throughout this process.
For instance:
sudo su
cd /etc/sllmate
openssl pkcs12 -keypbe PBE-SHA1-3DES -certpbe PBE-SHA1-3DES -inkey alpha.techcasita.com.key -in alpha.techcasita.com.chained.crt -export -out alpha.techcasita.com.pkcs12 -name tomcat
keytool -importkeystore -destkeystore tomcat.jks -srckeystore alpha.techcasita.com.pkcs12 -srcstoretype PKCS12 -alias tomcat
Tomcat Configuration
Next step is to and configure the “SSL HTTP/1.1 Connector” entry for the default HTTPS port, 443:
sudo nano /usr/share/tomcat/conf/server.xml
<?xml version="1.0" encoding="UTF-8"?> <Server port="8005" shutdown="SHUTDOWN"> <Listener className="org.apache.catalina.startup.VersionLoggerListener"/> <Listener className="org.apache.catalina.core.AprLifecycleListener" SSLEngine="on"/> <Listener className="org.apache.catalina.core.JreMemoryLeakPreventionListener"/> <Listener className="org.apache.catalina.mbeans.GlobalResourcesLifecycleListener"/> <Listener className="org.apache.catalina.core.ThreadLocalLeakPreventionListener"/> <GlobalNamingResources> <Resource name="UserDatabase" auth="Container" type="org.apache.catalina.UserDatabase" description="User database that can be updated and saved" factory="org.apache.catalina.users.MemoryUserDatabaseFactory" pathname="conf/tomcat-users.xml"/> </GlobalNamingResources> <Service name="Catalina"> <Connector port="8080" protocol="HTTP/1.1" connectionTimeout="20000" redirectPort="443"/> <Connector port="443" protocol="org.apache.coyote.http11.Http11NioProtocol" maxThreads="150" SSLEnabled="true" sslEnabledProtocols="TLSv1,TLSv1.1,TLSv1.2" ciphers="TLS_ECDHE_RSA_WITH_AES_128_CBC_SHA256, TLS_ECDHE_RSA_WITH_AES_128_CBC_SHA,TLS_ECDHE_RSA_WITH_AES_256_CBC_SHA384, TLS_ECDHE_RSA_WITH_AES_256_CBC_SHA,TLS_ECDHE_RSA_WITH_RC4_128_SHA, TLS_RSA_WITH_AES_128_CBC_SHA256,TLS_RSA_WITH_AES_128_CBC_SHA,TLS_RSA_WITH_AES_256_CBC_SHA256, TLS_RSA_WITH_AES_256_CBC_SHA,SSL_RSA_WITH_RC4_128_SHA" scheme="https" secure="true" clientAuth="false" sslProtocol="TLS" keyAlias="tomcat" keystoreFile="/etc/sslmate/tomcat.jks" keystorePass="myStrongPassword"/> <Connector port="8009" protocol="AJP/1.3" redirectPort="8443"/> <Engine name="Catalina" defaultHost="localhost"> <Realm className="org.apache.catalina.realm.LockOutRealm"> <Realm className="org.apache.catalina.realm.UserDatabaseRealm" resourceName="UserDatabase"/> </Realm> <Host name="localhost" appBase="webapps" unpackWARs="true" autoDeploy="true"> <Valve className="org.apache.catalina.valves.AccessLogValve" directory="logs" prefix="localhost_access_log" suffix=".txt" pattern="%h %l %u %t "%r" %s %b"/> </Host> </Engine> </Service> </Server>
Optionally, you could consider adding the following attributes into the Connector tag as well:
- minSpareThreads=”25″
- maxSpareThreads=”75″
- enableLookups=”false”
- disableUploadTimeout=”true”
- acceptCount=”100″
That’s pretty much it. However, re-starting the Tomcat server may not have the desired effect, if you don’t run tomcat as root. By using the default HTTPS port 443 instead of 8443 for instance, a so called privileged port is used. Port numbers below 1024 are not allowed to run servers on and the following error shows up in the Tomcat log file:
However, once you have figured out what the actual java binary file is, setcap (a Linux command to set file capabilities) can be used, to allow a non-root process to listen on a privileged port..
sudo setcap cap_net_bind_service+ep /usr/lib/jvm/java-8-oracle/bin/java
Now it’s time to restart Tomcat …
Final Result
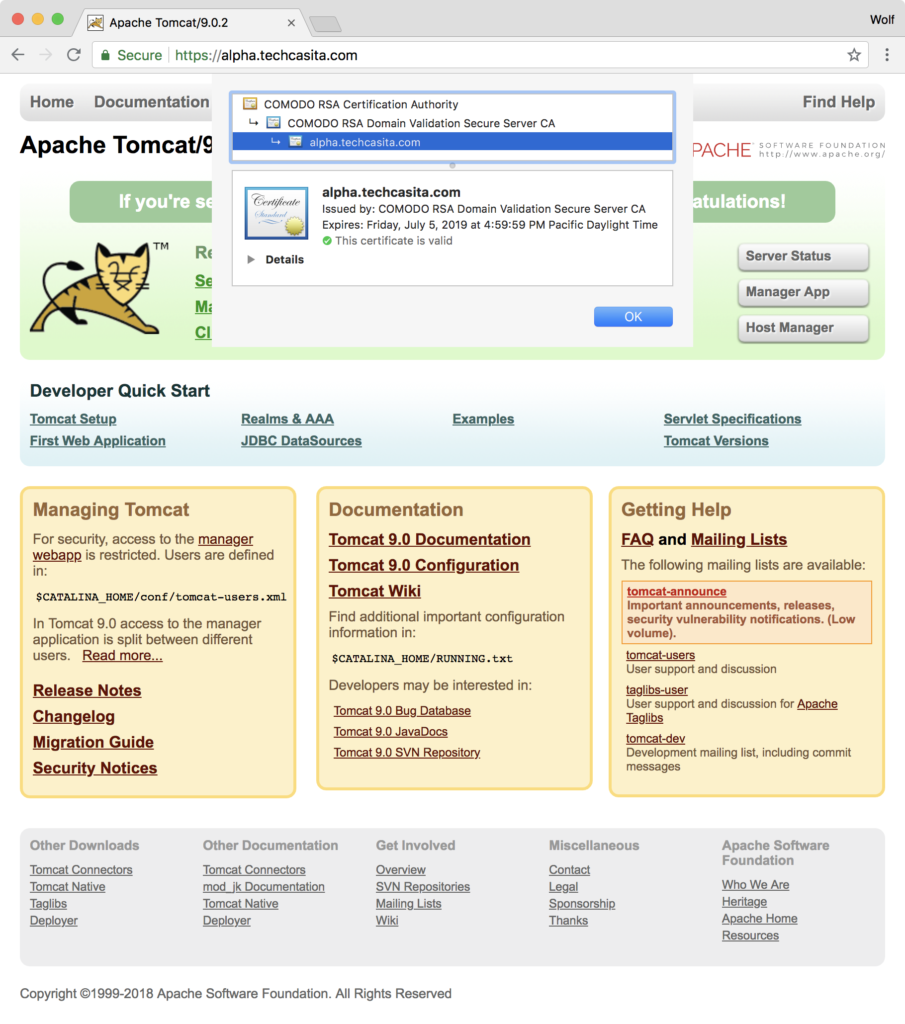
Final Check
To be sure that all is good, use one of the SSL Checkers, to verify the configuration. Here for instance I have used SSLShopper, which spotted one of my misconfiguration before:

Hello,
I use
setcap cap_net_bind_service+ep /usr/lib/jvm/java-8-oracle/jre/bin/java
But now, when I try to restart tomcat the console has the following output
error while loading shared libraries: libjli.so: cannot open shared object file: No such file or directory
Run this command:
# echo “/path/to/jdk/lib/amd64/jli” > /etc/ld.so.conf.d/java-libjli.conf