
The main idea for this blog post was using the Mac, for quickly developing and deploying a Web app in Java. I’m using RestEasy on top of Tomcat as my server platform and Intellij IDEA as my preferred IDE. Once the webapp has been built and tested locally, IDEA is also used for archiving the webapp and remotely deploying it to a Linux box.
RESTEasy is used to build a simple wrapper, exposing the implemented functionality as Web Service, but without having to modify the core implementation and to keep it independent from all Web-Service related resources.
So let’s get started.
1. Java 8
1st stop is at Oracle.com, to pick up the latest Java 8 JDK. As I’m writting this, Java SE Development Kit 8u5 downloads as jdk-8u5-macosx-x64.dmg into my ~/Downloads folder.
Opening the dmg file and running the installer, copies the Java VM and Runtime into
/Library/Java/JavaVirtualMachines/jdk1.8.0_05.jdk
and to make sure that this new Java version is used, I’m editing the hidden
~/.bash_profile
file (TextMate for instance, will edit this file, if you enter mate ~/.bash_profile). The line that needs to go into bash_profile should look like this:
export set JAVA_HOME=/Library/Java/JavaVirtualMachines/jdk1.8.0_05.jdk/Contents/Home
and after closing and re-opening the terminal, java -version should respond like so:
$ java -version
java version "1.8.0_05"
Java(TM) SE Runtime Environment (build 1.8.0_05-b13)
Java HotSpot(TM) 64-Bit Server VM (build 25.5-b02, mixed mode)
2. Tomcat 8
Next stop is Apache.org, to pick up the latest Tomcat distribution. The current version for Tomcat is 8.0.8 and I’m downloading the Binary Distributions – Core tar.gz file.
The next few steps include uncompressing the archive, followed by moving its files into /Library/Tomcat, and changing their ownership and permissions.
cd ~/Downloads/
tar -zxvf ./apache-tomcat-8.0.12.tar.gz
sudo mkdir -p /usr/local
sudo mv ~/Downloads/apache-tomcat-8.0.12 /usr/local
sudo rm -f /Library/Tomcat
sudo ln -s /usr/local/apache-tomcat-8.0.12 /Library/Tomcat
sudo chown -R <your_username> /Library/Tomcat
sudo chmod +x /Library/Tomcat/bin/*.sh
(I have written in much more details about those steps here.
Now it’s time to install Activata’s Tomcat Controller, a tiny freeware app, providing a UI to quickly start/stop Tomcat. Launch it, but click the Start button only after entering /Library/Tomcat for its Tomcat Home Directory preference.
Clicking View loads Tomcat’s default home page in your browser.

Almost done with Tomcat. Let’s just fix some settings, while we are here. To access Tomcat’s manager-gui and admin-gui, a username and password need to be entered into /Library/Tomcat/conf/tomcat-users.xml
<tomcat-users>
  <role rolename="manager-gui"/>
  <role rolename="admin-gui"/>
  <user username="wolf" password="******" roles="manager-gui,admin-gui"/>
</tomcat-users>
If the Mac is your development or staging server and you also have a remote production server, you want to change its conf/tomcat-users.xml file as well and also make some changes to its conf/server.xml file, but more about this later.
3. RestEasy
Next stop is RestEasy, a JBoss project that provides various frameworks to help you build RESTful Web Services and RESTful Java applications. RestEasy’s current version is 3.0.7, a 44MB download, go and get it.
Fortunately, we won’t need all of it. Uncompress the zip archive and keep it at a safe place for now. For me that is ~/MyRepo/resteasy-jaxrs-3.0.7.Final
4. Java App and Web App
Now, I’m launching IntelliJ, arguably the best IDE for Java development, and create a new Empty Project, naming it Easy. Before adding any modules, I’m setting the Project SDK to 1.8. Next comes the creation of two new modules inside this still empty project.
- A Simple Java (not EE) Java application module, I named MyApp
- A Java EE Web Application Project, I call MyWeb
4.1. Java Application Module
The simple Java application I’m going to write is just a simple Dictionary, exposing this functionality:
- lookup word – returns its meaning
- enter word, meaning – enters a new entry into the dictionary
- delete word – removes an entry from the dictionary
- content – returns the complete dictionary
- serialize – returns the complete dictionary, json-encoded
import org.boon.json.JsonFactory;
import org.boon.json.ObjectMapper;

import java.io.BufferedReader;
import java.io.IOException;
import java.io.InputStreamReader;
import java.io.OutputStream;
import java.util.Map;
import java.util.TreeMap;

/**
 * A simple Dictionary implementation, that lists the words of a language in alphabetical order and gives their meaning.
 */
public class Dictionary {
    private static final String NOT_FOUND = "The dictionary does not contain an entry for ";
    private final Map<String, String> mDictionary;

    public Dictionary() {
        mDictionary = new TreeMap<String, String>();
    }

    /**
     * @param word {@link java.lang.String}
     * @return the meaning of then given word.
     */
    public String lookup(final String word) {
        if (mDictionary.containsKey(word)) {
            return mDictionary.get(word);
        } else {
            return NOT_FOUND + word;
        }
    }

    /**
     * Enters a new entry in the dictionary.
     *
     * @param word    {@link java.lang.String}
     * @param meaning {@link java.lang.String}
     */
    public void enter(final String word, final String meaning) {
        mDictionary.put(word, meaning);
    }

    /**
     * Deletes the entry for the given word.
     *
     * @param word {@link java.lang.String}
     */
    public void delete(final String word) {
        mDictionary.remove(word);
    }

    /**
     * @param os {@link java.io.OutputStream}
     * @return the complete alphabetically sorted dictionary
     * @throws IOException
     */
    public OutputStream content(final OutputStream os) throws IOException {
        for (Map.Entry<String, String> entry : mDictionary.entrySet()) {
            os.write((entry.getKey() + " : " + entry.getValue() + "\n").getBytes());
        }
        return os;
    }

    /**
     * Writes the complete alphabetically sorted dictionary as a JSON String into the output stream.
     *
     * @param os {@link java.io.OutputStream}
     * @return the given OutputStream.
     * @throws IOException
     */
    public OutputStream serialize(final OutputStream os) throws IOException {
        ObjectMapper mapper = JsonFactory.create();
        mapper.writeValue(os, mDictionary);
        os.flush();
        return os;
    }

    public static void main(String[] args) {

        Dictionary dict = new Dictionary();
        System.out.printf("Usage:\n" +
                " lookup <word> - returns its meaning\n" +
                " enter <word> <meaning> - enters a new entry into the dictionary\n" +
                " delete <word> - removes an entry from the dictionary\n" +
                " content - returns the complete dictionary\n" +
                " serialize - returns the complete dictionary, json-encoded");

        while (true) {
            System.out.print("\n> ");
            BufferedReader lineOfText = new BufferedReader(new InputStreamReader(System.in));
            try {
                final String textLine = lineOfText.readLine();
                int m = textLine.indexOf(" ");
                final String cmd = textLine.substring(0, m > 0 ? m++ : textLine.length());
                if ("content".equals(cmd)) {
                    dict.content(System.out);
                } else if ("serialize".equals(cmd)) {
                    dict.serialize(System.out);
                } else {
                    int n = textLine.indexOf(" ", m);
                    final String param = textLine.substring(m, n > 0 ? n++ : textLine.length());
                    if ("delete".equals(cmd)) {
                        dict.delete(param);
                    } else if ("enter".equals(cmd)) {
                        dict.enter(param, textLine.substring(n));
                    }
                    System.out.println(param + " : " + dict.lookup(param));
                }
            } catch (IOException e) {
                System.out.println(e.toString());
                break;
            }
        }
    }
}
The serialization into JSON is mainly to have at least one dependent module library. In this case, I’m using Richard Hightower’s wickedly fast boon json parser. I created a lib folder inside the module, copied the boon.jar into it, and finally added it as a module dependency.
4.2. Web Application Module
Moving on. Let’s work on the Web Module. Again, I’m creating a lib folder inside the module, and copy the following jars from the RestEASY project:
- commons-logging-1.1.1.jar
- jackson-annotations-2.3.2.jar
- jackson-core-2.3.2.jar
- jackson-core-asl-1.9.12.jar
- jackson-databind-2.3.2.jar
- jackson-jaxrs-1.9.12.jar
- jackson-jaxrs-base-2.3.2.jar
- jackson-jaxrs-json-provider-2.3.2.jar
- jackson-mapper-asl-1.9.12.jar
- jackson-module-jaxb-annotations-2.3.2.jar
- jackson-xc-1.9.12.jar
- javax.json-1.0.3.jar
- javax.json-api-1.0.jar
- jaxb-api-2.2.7.jar
- jaxrs-api-3.0.7.Final.jar
- resteasy-cache-core-3.0.7.Final.jar
- resteasy-jackson-provider-3.0.7.Final.jar
- resteasy-jaxb-provider-3.0.7.Final.jar
- resteasy-jaxrs-3.0.7.Final.jar
- resteasy-jettison-provider-3.0.7.Final.jar
All these jars need to be added as module dependencies (scope is compile). Moreover, the /Library/Tomcat/lib/servlet-api.jar (located in Tomcat’s lib folder) needs to be added as a dependencies as well, but here, the provided scope is used, so that it’s not deployed with the web-app. While still in the UI for setting up all these dependencies, I’m adding the MyApp module as a Module-Dependency to the MyWeb module.
Here is the RedHat/JBoss documentation for RESTEasy – currently for JBoss Enterprise Application Platform 6.3.
The idea for the next step is to expose the Dictionary as a WebService, with little effort, but also without having to modify the Dictionary class, which ideally should remain independent from all Web-Service related resources. So we simply build a small wrapper:
4.2.1. The JAX-RS application class publishes our REST services to the runtime
import org.jboss.resteasy.core.Dispatcher;

import javax.ws.rs.core.Application;
import javax.ws.rs.core.Context;
import java.util.HashSet;
import java.util.Set;

/**
 * The JAX-RS application publishes our REST services to the runtime.
 */
public class MyApplication extends Application {

    private Set<Object> singletons = new HashSet<Object>();

    public MyApplication(@Context Dispatcher dispatcher) {
        singletons.add(new MyService(dispatcher.getDefaultContextObjects()));
    }

    @Override
    public Set<Object> getSingletons() {
        return singletons;
    }
}
4.2.2. The service class wraps each Dictionary method
The service can expose the same Dictionary to all users or maintain a different one for each user.
The content() method shows how a dynamically generated JSON – File could be returned.
import com.techcasita.demo.Dictionary;

import javax.servlet.http.HttpServletRequest;
import javax.servlet.http.HttpServletResponse;
import javax.servlet.http.HttpSession;
import javax.ws.rs.*;
import javax.ws.rs.core.Context;
import javax.ws.rs.core.Response;
import java.io.IOException;
import java.util.Map;

@Path("/")
public class MyService {
    private static final boolean GLOBAL_DICTIONARY = false; // true means all sessions access the same Dictionary
    private static final String SESSION_ATTR_NAME = MyService.class.getName() + "_Dictionary";
    @Context
    private HttpServletRequest httpRequest;
    @Context
    private HttpServletResponse httpResponse;

    private final Dictionary mDictionary = new Dictionary();

    public MyService(final Map<Class, Object> env) {
        // env provides access to ServletConfig and ServletContext.
    }

    private Dictionary getDictionary(HttpSession session) {
        if (GLOBAL_DICTIONARY) { // all sessions access the same Dictionary
            return mDictionary;
        } else { // each session gets its own Dictionary
            Dictionary dictionary = (Dictionary) session.getAttribute(SESSION_ATTR_NAME);
            if (dictionary == null) {
                session.setAttribute(SESSION_ATTR_NAME, dictionary = new Dictionary());
            }
            return dictionary;
        }
    }

    /**
     * Here we declare how the meaning for a word can be accessed.
     * E.g.:  http://server:port/dictionry?word=hello
     *
     * @param key {@link String} word to be lookup in the dictionary
     * @return the meaning of the word.
     */
    @GET
    @Path("/dictionary/{word}")
    @Produces("text/plain")
    public Response lookup(@PathParam("word") String key) {
        return Response.ok(getDictionary(httpRequest.getSession()).lookup(key)).build();
    }

    @GET
    @Path("/dictionary")
    @Produces("application/octet-stream")
    public Response content() {
        httpResponse.setHeader("Content-Disposition", "attachment;filename=dictionary.json");
        try {
            getDictionary(httpRequest.getSession()).serialize(httpResponse.getOutputStream());
        } catch (IOException e) {
            e.printStackTrace();
        }
        return Response.ok().build();
    }

    @POST
    @Path("/dictionary/{word}{meaning}")
    @Produces("text/plain")
    public Response enter(@FormParam("word") String key, @FormParam("meaning") String value) {
        getDictionary(httpRequest.getSession()).enter(key, value);
        return Response.ok("OK").build();
    }

    @DELETE
    @Path("/dictionary/{word}")
    @Produces("text/plain")
    public Response delete(@PathParam("word") String key) {
        getDictionary(httpRequest.getSession()).delete(key);
        return Response.ok("OK").build();
    }
}
4.2.3. The Deployment Descriptor
<?xml version="1.0" encoding="UTF-8"?>
<web-app xmlns="http://xmlns.jcp.org/xml/ns/javaee"
         xmlns:xsi="http://www.w3.org/2001/XMLSchema-instance"
         xsi:schemaLocation="http://xmlns.jcp.org/xml/ns/javaee http://xmlns.jcp.org/xml/ns/javaee/web-app_3_1.xsd"
         version="3.1">

    <context-param>
        <param-name>resteasy.servlet.mapping.prefix</param-name>
        <param-value>/</param-value>
    </context-param>

    <servlet>
        <servlet-name>MyRestService</servlet-name>
        <servlet-class>org.jboss.resteasy.plugins.server.servlet.HttpServletDispatcher</servlet-class>
        <init-param>
            <param-name>javax.ws.rs.Application</param-name>
            <param-value>com.techcasita.rest.MyApplication</param-value>
        </init-param>
    </servlet>

    <servlet-mapping>
        <servlet-name>MyRestService</servlet-name>
        <url-pattern>/dictionary/*</url-pattern>
    </servlet-mapping>

    <session-config>
        <session-timeout>
            30
        </session-timeout>
    </session-config>
    <welcome-file-list>
        <welcome-file>index.jsp</welcome-file>
    </welcome-file-list>
</web-app>
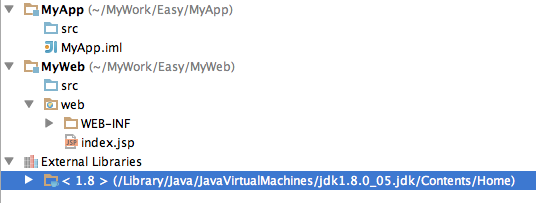
At this point, application and web module are done and the project structure in IntelliJ IDEA looks something like this:

The configuration screen for the “Artifact MyWeb:war exploded” in IntelliJ IDEA looks something like this:

5. Run/Debug Configuration
The Run/Debug configuration, on the Server tab, selects Tomcat 8.0.8 as the Application Server.
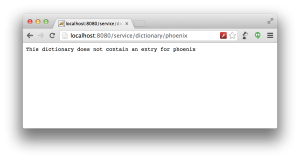
And on the Deployment tab, /service is entered as the context. I.e.
http://localhost:8080/service will be the URL to access this web app. In the deployment descriptor (web.xml) /dictionary/* was mapped to dispatch the MyApplication. Therefore: http://localhost:8080/service/dictionary/phoenix would be the URL to find the meaning for ‘phoenix’ in the dictionary.
With all this configured, Tomcat can now easily be started in the RUN or DEBUG mode and new entries can be posted into the dictionary or meaning can be retrieved with GET request.
6. Remote Deployment
To deploy the web app on a remote Tomcat instance, instead of or additionally to locally, a few configuration changes are necessary on the remote end.
I downloaded the “JMX Remote jar” from Tomcat’s distribution site (look under Extras) into the remote server’s tomcat/lib directory.
Tomcat’s conf/server.xml file needs to be edited and the following listener needs to be inserted:
<Listener
  className="org.apache.catalina.mbeans.JmxRemoteLifecycleListener"
  rmiRegistryPortPlatform="10001" rmiServerPortPlatform="10002" />
Then I added the following line close to the top into tomcat’s bin/catalina.sh file.
JAVA_OPTS="-Dcom.sun.management.jmxremote

-Dcom.sun.management.jmxremote.port=1099

-Dcom.sun.management.jmxremote.ssl=false

-Dcom.sun.management.jmxremote.authenticate=false

-Dcom.sun.management.jmxremote.local.only=false

-Djava.rmi.server.hostname=192.168.200.16"
Additionally, like aforementioned, the conf/tomcat-users.xml may need to be edited as well.
Finally, if the remote server has firewall rules deployed, then those need to be adjusted, for instance like so:
#JMX

-A INPUT -m state --state NEW -m tcp -p tcp --dport 10001 -j ACCEPT

-A INPUT -m state --state NEW -m tcp -p tcp --dport 10002 -j ACCEPT

#Tomcat HTTP

-A INPUT -m state --state NEW -m tcp -p tcp --dport 8888 -j ACCEPT
With all these changes applied, the remote JMX capabilities of Tomcat can now be tested from a client laptop, by launching jconsole from a terminal end entering the following connection string under remote process: service:jmx:rmi://(hostname):10002/jndi/rmi://(hostname):10001/jmxrmi
Back in IntelliJ, I create a new Artifact for MyWeb module. The same as the one that is already there, but this time is a WebApplication Archive (and not exploded). On top, I replace the current name ‘MyWeb:war’ with ‘service’, which matches the context name.
6.1. Remote Run/Debug Configuration
So only thing missing is the Run/Debug configuration for the remote server. The important thing here is to declare how files are being deployed (in my case that is sftp) and the JMX port to tell Tomcat about a new app, starting it, etc.
And on the Deployment tab, the service artifact is deployed into ‘/’ which on Tomcat will create a context named ‘service’.