
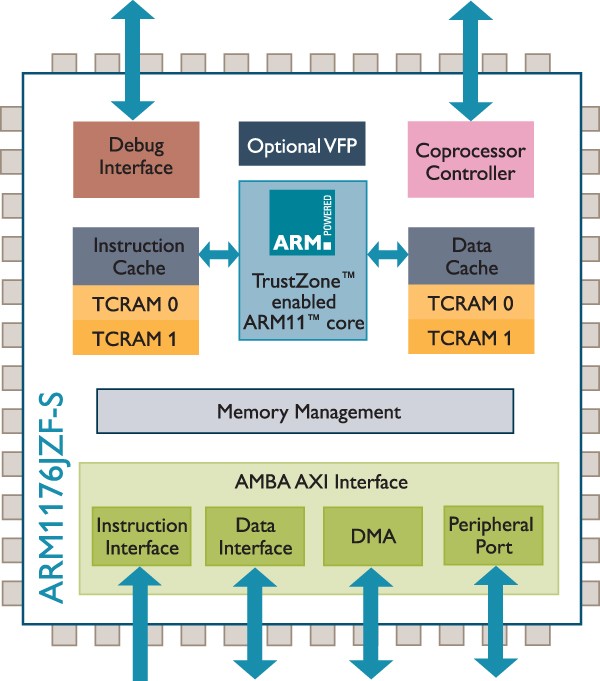
At its core, the Raspberry Pi uses the Broadcom BCM2835 System-on-a-chip. This single chip contains
- an ARM1176 CPU (normally clocked at 700MHz)
- a VideoCore 4 GPU, i.e. a low-power mobile multimedia processor (also used in the Roku-2)
- 256 MByte SDRAM
- in addition to the ARM’s MMU, a second coarse-grained Memory Management Unit for mapping ARM physical addresses onto system bus addresses.
The memory needs to be divided into ARM and GPU memory (happens by including one of the supplied start*.elf files into the boot partition). The minimum amount of memory which can be given to the GPU is 32MB. However that will restrict the multimedia performance and 32MB does not provide enough buffering for the GPU to do 1080p30 video decoding.
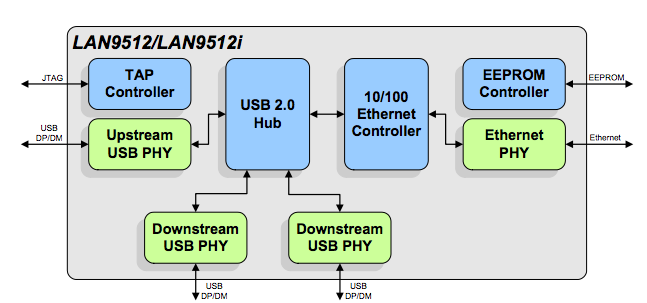
The second, slightly smaller chip on the Raspberry Pi board, is an LAN9512, an USB 2.0 hub and 10/100 MBit Ethernet controllers. The LAN9512 is a low-cost, power-efficient, small-footprint USB to Ethernet and multi-port USB connectivity solution in a single package, contains a Hi-Speed USB 2.0 hub with two fully-integrated downstream USB 2.0 PHYs, an integrated upstream USB 2.0 PHY, a 10/100 Ethernet MAC/PHY controller, and an EEPROM controller.
Boot Process
Besides the hardware board itself, starting with the boot process seems to be as good an idea as any… When the Raspberry Pi powers up, it’s the GPU that is active, looking for bootcode.bin, loader.bin, start.elf at the root dir of the first partition at the (fat formatted) SDCard. I.e., booting is hardcoded to happen from the SDCard.
The GPU reads and executes bootcode.bin, which then loads loader.bin, which loads start.elf.
Again in the root dir of the first partition it looks for config.txt, contains information like the arm speed (defaults to 700MHz), address from where to load kernel.img, etc.
Now it kernel.img (arm boot binary file) is copied it to memory and the ARM11 is reset that it runs from the address where kernel.img (default kernel_address 0x8000) was loaded.
Memory Split
The memory needs to be divided into ARM and GPU memory and currently, we have three start.elf files to choose from (see below for details).
- arm128_start.elf: 1:1, 128MBytes for the ARM11 and 128MBytes for the GPU
- arm192_start.elf: 3:1, 192MBytes for the ARM11 and 64MBytes for the GPU
- arm224_start.elf: 7:1, 224MBytes for the ARM11 and 32MBytes for the GPU
Broadcom states in their BCM2835 documentation that 32MBytes might not be enough memory for the GPU and until you reach the point where 128MByte aren’t quite enough for the ARM, you may want to go with the 1:1 spit.
Minimal Boot Image and Blinky Program
Let’s put this Boot Process assumptions that were made above to the test.
- Prepare an SDCard card (a 1 GByte Class-2 cards works just fine) by formatting it with the MS-DOS (FAT) file system.
- Download a Raspberry Pi Distribution (currently wheezy-raspbian vers.2012-07-15), uncompress the zip file and open the resulting image file 2012-07-15-wheezy-raspbian.img, for instance with DiskImageMounter, if you are using Mac OS X.
- Copy bootcode.bin form the wheezy-raspbian.img to the root directory of the SDCard.
- Copy loader.bin form the wheezy-raspbian.img to the root directory of the SDCard.
- Copy arm128_start.elf form the wheezy-raspbian.img to the root directory of the SDCard and rename it to start.elf.
- Copy config.txt form the wheezy-raspbian.img to the root directory of the SDCard.
- Add the following two lines to your config.txt:
kernel blinky.bin
kernel_address 0x8000 - Uncompress and copy blinky.bin to the root directory of the SDCard.
Now insert the SDCard into your Raspberry Pi and power it up. If all goes well, you should see the Raspberry Pi’s OK LED blink.
The five files, which total just over 2MBytes are probably the closest and smallest you can get to an Hello_World style program for the Raspberry Pi.
…
Stay tuned for how to create your own Raspberry Pi Tool Chain and how to make blinky.