Using a serial connection to connect to a Raspbery Pi has many advantages. The boot process (Kernel boot messages go to the UART at 115,200 bit/s) can be monitored, without the need to hookup an HDMI-Monitor. Once booted, you can of course login through a serial terminal as well, i.e. the serial connection allows logging-in form a remote computer without running an SSH daemon on the Raspi.
UART TXD and RXD pins are easily accessible (GPIO 14 and 15), however, like for all GPIO pins, the voltage levels are 3.3 V and are not 5 V tolerant!
Since most of the desktop and laptop computers don’t come equipped with a serial port anymore, accessing the Raspberry Pi via a Serial Connection requires some requisites. I have recently connected to the Raspberry Pi using three different hardware setups ..
1. USB to Serial Adapter
There are many USB-to-Serial adapters available and while not all of them are capable to handle the highest data transfer speeds, the Keyspan HS-19 (OS-X drivers are available here) is certainly one of the best.
However, adapters based on the Prolific 2303 chip, like the Zonet ZUC3100, seem to be a little less expensive, well-supported in Linux, and much more widespread. Drivers for 2303 based devices can be found here, if required, use GUEST as user name and password to gain access.
E.g. I’m currently using the Mac OS X Universal Binary Driver v1.4.0 on OS X 10.8.1 without any issues.
1.1. Level Shifter
Very few of those USB-to-Serial adapters have the standard RS-232 +/- 12V voltage levels on the serial ports (the Zonet ZUC3100 w/ the pl2303 chip however does!) and using a level shifter is certainly a very good idea. Since the Raspi wants no more than 3.3V, TTL-RS-232 level converters based on the Maxim MAX3232 are your best choice.
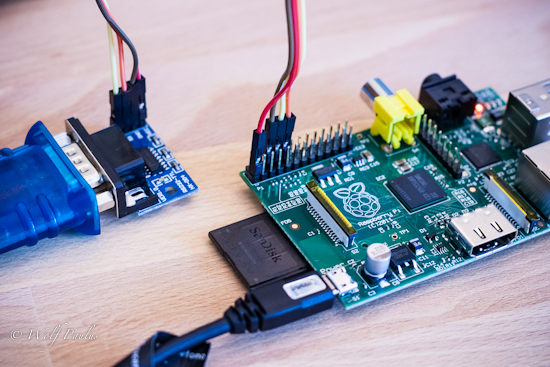
This photo shows the blue Zonet ZUC3100 Usb-to-Serial adapter, with a Maxim MAX3232 based level shifter. Since the level shifter needs to be powered, the Raspi’s 3.3V pin (red) and Ground (black) are connected to the Level-Shifter. Yellow and Orange are used for the Transmit and Receive lines.

On OS X, a simple Terminal with the screen /dev/tty.usbserial 115200 command issued is all what is needed to connect to the Raspberry Pi. A more dedicated application like CoolTerm may become handy as well.
2. FTDI Basic 3.3V – USB to Serial.
I have a basic breakout board for the FTDI FT232RL USB to serial IC, which is mainly used to program those Arduino boards that don’t have an USB connector. It can of course also be used for general serial applications. Big benefit here is that the FTDI Basic 3.3V already provides the 3.3V levels that the Raspbi requires. The Virtual COM Port Drivers (VCP-Drivers) for the host computer are available here
Since the FTDI Basic does’t need to be powered, only the TXD and RXD pins need to be connected.
This photo shows the FTDI Basic 3.3V Usb-to-Serial adapter, with only two (TXD and RXD) pins connected to the Raspberry Pi. Again, the FTDI Basic is powered through the USB connection coming from your host PC or Laptop. Still, the Raspberry Pi needs to be powered through its micro-usb port.

3. FTDI Basic 3.3V – USB to Serial.
If you look hard and long enough, you will find USB-to-Serial Cable, 6 Female Header Wires, 3.3V I/O, like this one over here at Micro Controller Shop. Adafruit has one as well here.
Cable like these are the easiest way ever to connect to the Raspberry Pi’s serial console port, since they can also power the Raspi.
The USB-to-Serial cable (uses an FTDI FT232RQ) is a USB-to-Serial (3.3V TTL level) converter cable which allows for a simple way to connect 3.3V TTL interface devices to USB.
The 3.3V TTL signals are color coded as follows:
- Black – GND
- Brown – CTS
- Red – +5V DC supply from USB
- Orange – TXD
- Yellow – RXD
- Green – RTS
This photo shows the Micro Controller Shop’s FTDI based 3.3V Usb-to-Serial adapter cable, powering the Raspberry Pi, as well as connecting to its TXD and RXD pins.

