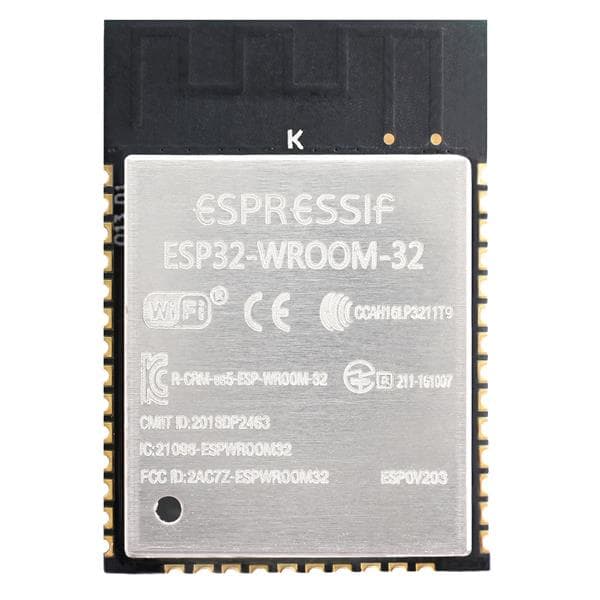
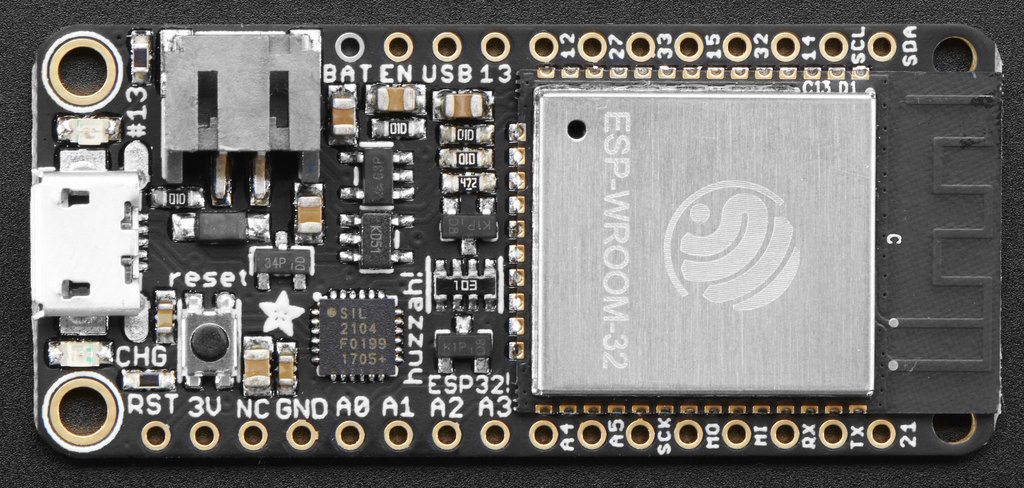
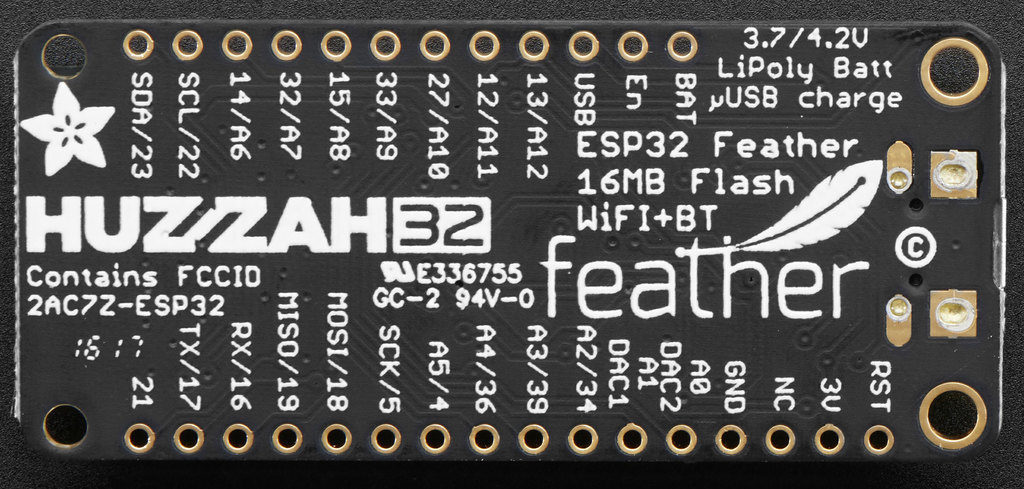
Adafruit’s HUZZAH32 Feather board is built with the official WROOM32 module:
- Two CPU cores that can be individually controlled, and the CPU clock frequency is adjustable from 80 MHz to 240 MHz
- 448 kB of ROM for booting and core functions.
- 520 kB of on-chip SRAM for data and instructions.
- 8 kB of SRAM in RTC, which is called RTC FAST Memory and can be used for data storage;
- 8 kB of SRAM in RTC, which is called RTC SLOW Memory and can be accessed by the co-processor during the Deep-sleep mode.
- 4 MByte flash include in the WROOM32 module
- Support for multiple external QSPI flash and SRAM chips.
- Wi-Fi Radio: 802.11 b/g/n (802.11n up to 150 Mbps) WPA/WPA2/WPA2-Enterprise/WPS
- BLE Radio: Bluetooth v4.2 BR/EDR and BLE specification
- On-board PCB antenna
GPIO & Analog Pins
- A0 – this is an analog input A0 and also an analog output DAC2. It can also be used as a GPIO #26. It uses ADC #2
- A1 – this is an analog input A1 and also an analog output DAC1. It can also be used as a GPIO #25. It uses ADC #2
- A2 – this is an analog input A2 and also GPI #34. Note it is not an output-capable pin! It uses ADC #1
- A3 – this is an analog input A3 and also GPI #39. Note it is not an output-capable pin! It uses ADC #1
- A4 – this is an analog input A4 and also GPI #36. Note it is not an output-capable pin! It uses ADC #1
- A5 – this is an analog input A5 and also GPIO #4. It uses ADC #2
- 21 – General purpose IO pin #21
- 13 – This is GPIO #13 and also an analog input A12 on ADC #1. It’s also connected to the red LED next to the USB port
- 12 – This is GPIO #12 and also an analog input A11 on ADC #2. This pin has a pull-down resistor built into it, we recommend using it as an output only, or making sure that the pull-down is not affected during boot.
- 27 – This is GPIO #27 and also an analog input A10 on ADC #2
- 33 – This is GPIO #33 and also an analog input A9 on ADC #1. It can also be used to connect a 32 KHz crystal.
- 15 – This is GPIO #15 and also an analog input A8 on ADC #2
- 32 – This is GPIO #32 and also an analog input A7 on ADC #1. It can also be used to connect a 32 KHz crystal.
- 14 – This is GPIO #14 and also an analog input A6 on ADC #2
- A13 – This is general purpose input #35 and also an analog input A13, which is a resistor divider connected to the VBATline
Micro Python
MicroPython is a tiny open source Python programming language interpreter that runs on small embedded development boards.
Philip van Allen published a Getting Started Guide for using Micro Python on ESP32 boards like the Adafruit Huzzah32. With Python3 installed on a Mac, the following libraries are needed: esptool, adafruit-ampy and can be quickly installed like so:
pip3 install esptool --upgrade
pip3 install adafruit-ampy --upgrade
USB to UART Bridge Virtual COM Port (VCP) drivers
- For Mac OS 10.11 and newer (even on Apple Silicon Macs) the standard driver (Version 6.0.2) should be used. On older Mac OS version, try installing the legacy MacVCP USB to Serial driver (at 1st it might not look like it, but the legacy driver can be found inside this package installer) for Adafruit Huzzah32, after which and once connected with a USB cable, the ESP32 board will show up as
/dev/tty.SLAB_USBtoUART– don’t get fooled, without the driver installed, you can discover this port: /dev/tty.usbserial-01425BD6 – however, only after the driver was installed, the much needed /dev/tty.SLAB_USBtoUART port will be available. - Wipe the flash memory clean:
esptool.py --chip esp32 -p /dev/tty.SLAB_USBtoUART erase_flash
which will display the following output:
esptool.py v4.3
Serial port /dev/tty.SLAB_USBtoUART
Connecting.....
Chip is ESP32-D0WDQ6 (revision v1.0)
Features: WiFi, BT, Dual Core, Coding Scheme None
Crystal is 40MHz
MAC: 30:ae:a4:24:03:d4
Uploading stub...
Running stub...
Stub running...
Erasing flash (this may take a while)...
Chip erase completed successfully in 5.2s
Hard resetting via RTS pin...
- Download the latest stabile MicroPython Standard (not the SPIRAM version) Firmware for ESP32 Espressif boards: (currently esp32-20220618-v1.19.1) and flash it onto the board:
esptool.py --chip esp32 -p /dev/tty.SLAB_USBtoUART write_flash -z 0x1000 ~/Downloads/esp32.bin
which will display the following output:
esptool.py v4.3
Serial port /dev/tty.SLAB_USBtoUART
Connecting....
Chip is ESP32-D0WDQ6 (revision v1.0)
Features: WiFi, BT, Dual Core, Coding Scheme None
Crystal is 40MHz
MAC: 30:ae:a4:24:03:d4
Uploading stub...
Running stub...
Stub running...
Configuring flash size...
Flash will be erased from 0x00001000 to 0x0017efff...
Compressed 1560976 bytes to 1029132...
Wrote 1560976 bytes (1029132 compressed) at 0x00001000 in 90.8 seconds (effective 137.6 kbit/s)...
Hash of data verified.

Leaving...
Hard resetting via RTS pin...
After a reset, screen /dev/tty.SLAB_USBtoUART 115200 will show the python prompt
MicroPython v1.19.1 on 2022-06-18; ESP32 module with ESP32
Type "help()" for more information.
Entering help(), will display the following output:
Welcome to MicroPython on the ESP32!

For generic online docs please visit http://docs.micropython.org/

For access to the hardware use the 'machine' module:

import machine
pin12 = machine.Pin(12, machine.Pin.OUT)
pin12.value(1)
pin13 = machine.Pin(13, machine.Pin.IN, machine.Pin.PULL_UP)
print(pin13.value())
i2c = machine.I2C(scl=machine.Pin(21), sda=machine.Pin(22))
i2c.scan()
i2c.writeto(addr, b'1234')
i2c.readfrom(addr, 4)

Basic WiFi configuration:

import network
sta_if = network.WLAN(network.STA_IF); sta_if.active(True)
sta_if.scan()                             # Scan for available access points
sta_if.connect("", "") # Connect to an AP
sta_if.isconnected()                      # Check for successful connection

Control commands:
  CTRL-A        -- on a blank line, enter raw REPL mode
  CTRL-B        -- on a blank line, enter normal REPL mode
  CTRL-C        -- interrupt a running program
  CTRL-D        -- on a blank line, do a soft reset of the board
  CTRL-E        -- on a blank line, enter paste mode

For further help on a specific object, type help(obj)
For a list of available modules, type help('modules')
and CTRL-D shows the current OS version: E.g.,:
MicroPython v1.19.1 on 2022-06-18; ESP32 module with ESP32
How much Memory?
>>> import gc
>>> gc.collect()
>>> gc.mem_free()
109696
>>>
.. gc.mem_free() returns the free heap size in bytes. Therefore, about 107 KBytes of Heap Memory is available.
Modules
>>> help('modules')
__main__          gc                ubluetooth        upysh
_boot             inisetup          ucollections      urandom
_onewire          math              ucryptolib        ure
_thread           micropython       uctypes           urequests
_uasyncio         neopixel          uerrno            uselect
_webrepl          network           uhashlib          usocket
apa106            ntptime           uheapq            ussl
btree             onewire           uio               ustruct
builtins          uarray            ujson             usys
cmath             uasyncio/__init__ umachine          utime
dht               uasyncio/core     umqtt/robust      utimeq
ds18x20           uasyncio/event    umqtt/simple      uwebsocket
esp               uasyncio/funcs    uos               uzlib
esp32             uasyncio/lock     upip              webrepl
flashbdev         uasyncio/stream   upip_utarfile     webrepl_setup
framebuf          ubinascii         uplatform         websocket_helper
Plus any modules on the filesystem
>>>
Builtins
>>>import builtins
>>>dir(builtins)
['__class__', '__name__', 'ArithmeticError', 'AssertionError', 'AttributeError', 'BaseException', 'EOFError', 'Ellipsis', 'Exception', 'GeneratorExit', 'ImportError', 'IndentationError', 'IndexError', 'KeyError', 'KeyboardInterrupt', 'LookupError', 'MemoryError', 'NameError', 'NotImplementedError', 'OSError', 'OverflowError', 'RuntimeError', 'StopIteration', 'SyntaxError', 'SystemExit', 'TypeError', 'ValueError', 'ZeroDivisionError', 'abs', 'all', 'any', 'bool', 'bytearray', 'bytes', 'callable', 'chr', 'classmethod', 'dict', 'dir', 'divmod', 'eval', 'exec', 'getattr', 'globals', 'hasattr', 'hash', 'id', 'int', 'isinstance', 'issubclass', 'iter', 'len', 'list', 'locals', 'map', 'next', 'object', 'open', 'ord', 'pow', 'print', 'range', 'repr', 'round', 'set', 'setattr', 'sorted', 'staticmethod', 'str', 'sum', 'super', 'tuple', 'type', 'zip', '__build_class__', '__import__', '__repl_print__', 'NotImplemented', 'StopAsyncIteration', 'UnicodeError', 'ViperTypeError', 'bin', 'compile', 'complex', 'delattr', 'enumerate', 'execfile', 'filter', 'float', 'frozenset', 'help', 'hex', 'input', 'max', 'memoryview', 'min', 'oct', 'property', 'reversed', 'slice']
>>>
File System
There is already a boot.py file stored in the file system.
>>> import os
>>> os.listdir()
['boot.py']
>>> open('boot.py').read()
# This file is executed on every boot (including wake-boot from deepsleep)
#import esp
#esp.osdebug(None)
#import webrepl
#webrepl.start()
Additionally, a main.py (which will automatically execute after boot.py) could be put there, for instance using ‘ampy -p /dev/tty.SLAB_USBtoUART put ~/Desktop/main.py’
Adding the following variables to your ~/.bash_profile makes working with ampy command line tool much more convenient:
export AMPY_PORT='/dev/tty.SLAB_USBtoUART'
export AMPY_BAUD=115200
export AMPY_DELAY=0.5
However, enabling webrepl makes the development process much faster. If possible, I recommend to provide the ESP32 with a static IP address, e.g. by mapping its MAC address to an IP in your Wifi Router settings.
Next edit the boot.py, providing your wifi router’s SSID and password, so that it looks something like this:
"""
This file is executed on every boot (including wake-boot from deepsleep)
"""
import network
import utime

WifiSSID = "..."
WifiPassword = "..."
Ep32HostName = "..."

def connect():
    sta_if = network.WLAN(network.STA_IF)
    if not sta_if.isconnected():
        print('connecting to network...')
        sta_if.active(True)
        sta_if.connect(WifiSSID, WifiPassword)
        sta_if.config(dhcp_hostname=Ep32HostName)
        # while the below while loop is part of the standard recommended approach,
        # I found it could hang the device if run with connect() on boot
        # while not sta_if.isconnected():
        #     pass
    print('network config:', sta_if.ifconfig())

def showip():
    import network
    sta_if = network.WLAN(network.STA_IF)
    print('network config:', sta_if.ifconfig())
    print('hostname:', sta_if.config('dhcp_hostname'))

connect()
for i in range(10):
    sta_if = network.WLAN(network.STA_IF)
    if not sta_if.isconnected():
        utime.sleep(1)
        print('.', end=' ')
    else:
        break

showip()

import webrepl
webrepl.start()
If you don’t want to enter a password every time you connect to the ESP32 via WebREPL, you may also want to create a webrepl_cfg.py file with just one line like this:
PASS = ''
You, Sir, are a steely eyed missile man. Everything I needed to get moving forward. Take a bow.