 The idea behind the Vocal-Emotion Lamp is rather simple: to use a small affordable computer that can continually recognize emotion from the human voice and then visualize the result of the analysis, effortlessly and enjoyably.
The implementation of this idea uses the small and inexpensive Raspberry Pi computer, extended with a far-field microphone expansion board. The software that performs the emotion recognition directly from the microphone input, is based on the open-source version of the Vokaturi emotion recognition library. Vokaturi uses algorithms that have been designed by Paul Boersma, author of the world’s leading speech analysis software Praat.
Once an emotion has been recognized, the Raspberry Pi communicates over a Bluetooth connection with a smart light bulb, changing its color and intensity, bases on the recognized emotion(s). The overall hardware cost should be below one hundred dollars. Remarkably, when compared to many other voice enabled devices, the Emotion Lamp does not require an internet-connection to work. I.e., voice recordings will never leave the device, won’t even be stored on devices, only buffered for a few seconds, during processing.
Hardware
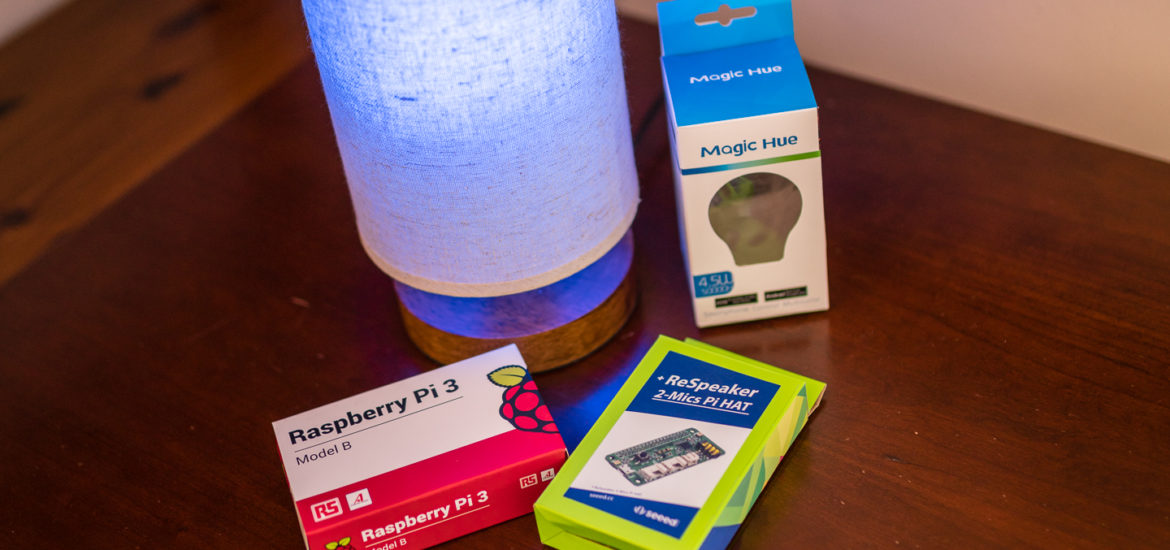
Lamp ($20)
A minimalist simple desk lamp with a linen fabric shade and a universal medium screw base will suffice; the only requirements are an E26 screw base and that the shade is tall enough, to completely cover the light bulb.
Bulb ($19)
A Magic Hue Bluetooth Smart Light Bulb; a dimmable multicolored Bluetooth 4.0 compatible light bulb.


Raspberry Pi ($35)
Raspberry Pi 3 Model B, a single-board computer with wireless LAN and Bluetooth connectivity, or the Raspberry Pi Zero W, which comes with wireless LAN and Bluetooth connectivity, meet the requirements for this project. The important part is the Bluetooth connectivity, therefore other/older Raspberry Pi models, might work as well, but require an additional Bluetooth 4.0 USB Adapter.

Microphone expansion board ($10)
ReSpeaker 2-Mics Pi HAT is a dual-microphone expansion board for Raspberry Pi, designed for AI and voice applications. The board is developed based on WM8960, a low power stereo codec. There are 2 microphones on both sides of the board for collecting sounds.
ReSpeaker is compatible with Raspberry Pi Zero, Raspberry Pi 1 B+, Raspberry Pi 2 B and Raspberry Pi 3 B.


Operation System
Installing Raspbian
[Details at https://www.raspberrypi.org/documentation/installation/installing-images/mac.md] At the time I’m writing this, the most recent version of the Debian for Raspberry Pi Linux distribution was released on 2017-11-29 and is available to download here. The “lite” version will do – and on a Mac, can be easily saved to a MicroSD card like so:Uncompressing the downloaded file will create the image file: 2017-11-29-raspbian-stretch-lite.img
After identifying the correct destination (i.e., the SDCard), the image can be copied like so:
diskutil list
...
/dev/disk5 (internal, physical):
 #: TYPE NAME SIZE IDENTIFIER
 0: FDisk_partition_scheme *8.0 GB disk5
 1: DOS_FAT_32 MOBIUS 8.0 GB disk5s1
...
diskutil unmountDisk /dev/disk5
sudo dd bs=4m if=~/Downloads/2017-11-29-raspbian-stretch-lite.img of=/dev/rdisk5 conv=sync
sudo diskutil eject /dev/rdisk5
Initial Setup
The initial setup requires a USB keyboard and HDMI monitor, connected to the Pi and depending on the Raspberry Pi model, an ethernet or WiFi connection to the Internet. Moreover, setting up the Raspberry Pi Zero W, requires a mini HDMI to HDMI adapter and a micro-USB to USB adapter, to connect a monitor and keyboard.

The initial login is pi and the password is raspberry.
sudo raspi-config- I usually start with option 8, updating this tool to its latest version.
- Option 1: Change Password
- Option 2: Network Option: Hostname (eli), Wifi SSID (Casita) and Wifi password
- Option 3: Boot Option: Text console, automatically login. Disable wait for network
- Option 4: Localization: Disable en_GB and enable en_US.UTF-8. Time-zone US Pacific. Wifi Country US
- Option 5: Interfacing Option: Enable SSH, SPI, I2C, and GPIO
- Option 7: Adv. Options: Expand Filesystem, Mem Split GPU=16MB
After a reboot, with ssh pi@<hostname>.local I can now login from any computer on my network, i.e. no need anymore, for the HDMI display and USB keyboard.
sudo apt-get update
sudo apt-get upgrade
Installing the ReSpeaker Driver
After seeding the ReSpeaker board and updating the Linux distribution, sudo aplay -l will not discover the ReSpeaker yet. However, this wiki shows the way: http://wiki.seeedstudio.com/ReSpeaker_2_Mics_Pi_HAT/
sudo apt-get install git
git clone https://github.com/respeaker/seeed-voicecard.git
cd seeed-voicecard
sudo ./install.sh 2mic
cd ..
rm -rf ./seeed-voicecard
sudo reboot
After the reboot, sudo aplay -l will now how the seeed card:
sudo aplay -l
**** List of PLAYBACK Hardware Devices ****
card 0: ALSA [bcm2835 ALSA], device 0: bcm2835 ALSA [bcm2835 ALSA]
Subdevices: 8/8
Subdevice #0: subdevice #0
Subdevice #1: subdevice #1
Subdevice #2: subdevice #2
Subdevice #3: subdevice #3
Subdevice #4: subdevice #4
Subdevice #5: subdevice #5
Subdevice #6: subdevice #6
Subdevice #7: subdevice #7
card 0: ALSA [bcm2835 ALSA], device 1: bcm2835 ALSA [bcm2835 IEC958/HDMI]
Subdevices: 1/1
Subdevice #0: subdevice #0
card 1: seeed2micvoicec [seeed-2mic-voicecard], device 0: bcm2835-i2s-wm8960-hifi wm8960-hifi-0 []
Subdevices: 1/1
Subdevice #0: subdevice #0
Calibrating the Microphone
If the devices gets moved around a lot, this process may have to be repeated frequently, Start the alsamixer app and press F6, allowing you to select a sound card, select “seeed-2mic-voicecard”. Now press F4 to select capture mode and use the cursor keys to select the Capture bar. Move it up, until you almost hit the red area and take note of the dB gain: (e.g 24.25)
Create a ~/.bash_profile file that will adjust the mic level on boot, like so:
cat > ~/.bash_profile
amixer -c 1 set Capture 24DB
hit Cntrl D …
Plugging in a pair of headphones into the Pi-Hat and running this test might be a good idea, checking that audio recording really works:
arecord -f cd -Dhw:1 | aplay -Dhw:1
Building Vokaturi for the Raspberry Pi’s 32bit Linux
The libraries that are included in the Vokaturi SDK are not compatible with Raspberry Pi and therefore have to be built on device. Depending on the actual Raspberry hardware, different compiler options need to be provided. See below:
wget https://developers.vokaturi.com/doc/OpenVokaturi-3-0.zip
unzip OpenVokaturi-3-0.zip
rm OpenVokaturi-3-0.zip
rm -rf __MACOSX/
mkdir ~/lib
cd OpenVokaturi-3-0/src/open
# Compiling for the Raspberry Pi 3 Model B:
gcc -Wall ./OpenVokaturi.c -lm -O3 -fPIC -shared -march=armv8-a+crc -mfpu=neon-fp-armv8 -mtune=cortex-a53 -o pi3b.so
cp ./pi3b.so ../../lib/open/linux/OpenVokaturi-3-0-linux32.so
mv ./pi3b.so ~/lib
# Compiling for the Raspberry Pi Zero W:
gcc -Wall ./OpenVokaturi.c -lm -O3 -fPIC -shared -mcpu=arm1176jzf-s -mfpu=vfp -o piZero.so
mv ./piZero.so ~/lib
rm -rf ~/OpenVokaturi-3-0/bin
After installing a few more python libraries, we can analyze the wave file that ships with the Vokaturi distribution
sudo apt-get install libatlas-base-dev python-scipy python3-pyaudio python3-dev python3-pip
sudo pip3 install scipy pyaudio pydub rpi.gpio spidev
#sudo pip3 install numpy --upgrade --ignore-installed #seems unnecessary
cd ~/OpenVokaturi-3-0/examples
python3 ./OpenVokaWavMean-linux32.py ./hello.wav

Loading library...
Analyzed by: OpenVokaturi version 2.2a for open-source projects, 2017-09-17
Distributed under the GNU General Public License, version 3 or later
Reading sound file...
   sample rate 44100.000 Hz
Allocating Vokaturi sample array...
   148160 samples, 2 channels
Creating VokaturiVoice...
Filling VokaturiVoice with samples...
Extracting emotions from VokaturiVoice...
Neutral: 0.760
Happy: 0.000
Sad: 0.238
Angry: 0.001
Fear: 0.000

# .. once working, we can remove the OpenVokaturi stuff
rm -rf ~/OpenVokaturi-3-0
Communicating with the Light Bulb
Fortunately, there is already a Python API, to control a Magic Blue bulb over Bluetooth.
sudo pip3 install magicblue
sudo magicblueshell
Magic Blue interactive shell v0.6.0
Type "help" for a list of available commands
> list_devices
Listing Bluetooth LE devices in range for 300 seconds. Press CTRL+C to abort searching.
ID Name Mac address
-- ---- -----------
1 NO_NAME 54:a2:51:be:d7:25
2 LEDBLE-7863459D f8:1d:78:63:45:9d
3 NO_NAME d0:d2:b0:7b:ab:75
4 NO_NAME 2b:26:3b:47:ed:c6
5 NO_NAME 44:e7:56:44:0d:43
6 NO_NAME 98:9e:63:32:9b:83
The LEDBLE device is the smart light bulb, which if asked, exposes more information about itself:
> connect 2
INFO:magicblue.magicblueshell:Connected
> read name
INFO:magicblue.magicblueshell:-------------------
INFO:magicblue.magicblueshell:Received name: LEDBLE-7863459D
> read device_info
INFO:magicblue.magicblueshell:-------------------
INFO:magicblue.magicblueshell:Received device_info:
{
  'r': 0,
  'g': 0,
  'b': 0,
  'effect': None,
  'version': 10,
  'effect_speed': 2,
  'effect_no': 74,
  'brightness': 0,
  'device_type': 21,
  'on': True
}
>
From all this information, the device’s MAC address and version are important and will be needed in the next and final step.

Putting it all together
At this point, we have a simple desk lamp, equipped with a multicolor Bluetooth connectable lightbulb, and a Raspberry Pi device with Bluetooth connectivity, equipped with a microphone.
The Raspberry Pi can record audio input and analyze audio information that is encoded in the wave format. The analysis provides Emotion Probabilities for core emotions like happiness, sadness, anger, and fear. Based on the identified emotions and their levels, we can now send color information to the lightbulb and make it light-up depending on the recognized emotions.
The three Neo-Pixels on top of the ReSpeaker board can be programmed to show the same color and intensity that is sent to the light bulb.
Configuration Capabilities
The light bulb’s MAC address, version, usage of the Neo-Pixels, and much more can be configured, by changing the values in the parameter document, stored in the pi user’s home folder: /home/pi/params.py
The multi threaded python app records audio and analyzes the previous recording at the same time. The sample-time (duration of a recording that is passed into the analyzer) is an important parameter to experiment with. The push button on top of the ReSpeaker board can be used, to increase the the sample-time (which defaults to [RECORD_SECONDS]), 0.1sec per recognized button push.
Another parameter [MIN_LOUDNESS] can be used to set up a minimum loudness level for an audio recording to be processed at all.
Each Emotion Probability can be mapped to its own color (R-G-B color values 0 to 255 … see this RGB Calculator)
Recognized emotions can either visualized discrete or blended. If [DISCRETE] is set to true, only the strongest emotion gets displayed. If [RELATIVE] is set to true, the light intensity reflects the strength of the recognized emotion. If [DISCRETE] is set to false, all emotion colors get blended together, based on each strength.
The NEO-Pixels on top of the board can be rather bright, but their maximum output value can the capped with the [MAX_NEO_VALUE] parameter. Moreover, none, one, two, or all three [NEO_PIXELS] can be used.
Parameters
#Mac address of the Lightbulb
MAC_ADDRESS = 'f8:1d:78:63:45:9d'

# Firmware Version in Lightbulb
BULB_VERSION = 10

# Sample time (i.e. length of the record that will be analyzed)
RECORD_SECONDS = 1.0

# Minimal loudness in sound input required for analysis. [0..100]
MIN_LOUDNESS = 63

# Show color of strongest emotion vs. mixing color by emotion strength
DISCRETE = True

# Show light intensity proportional to emotion strength (always true in none discrete mode)
RELATIVE = True

# Color RGB for emotions [int(red),int(red),int(green),int(blue)] all values [0..255]
neutrality = [0,255,0] # green
happiness = [255,90,0] # orange
sadness = [0,0,255] # blue
anger = [255,0,0] # red
fear = [255,0,255] # pink

# Use on device NEO-Pixels [0..3] where 0 means to not used them and 3 means use all off them
NEO_PIXELS = 3

# Maximal brightness for NEO-Pixels [0..255]
MAX_NEO_VALUE = 16

Application
The pi user’s ~/.bash_profile is already used to adjust the Mic input levels and can also launch the app on boot, adding ~/python3 emoLamp.py. The app will wait for the lightbulb to become available.
echo "Press Control C. Otherwise app will start in 5 seconds ..."
sleep 5
amixer -c 1 set Capture 18DB
python3 ./emoLamp.py
Connection
Depending on the Raspberry Pi model, a connection to the device can be made via ethernet cable or Wifi. Either way, ssh [email protected] will provide access to the device.
When installed via the my eli.iso image file, the RaspberryPi is configured the connect to an unprotected Wifi network with the SSID: Casita. This can be changed, by modifying the information in /etc/wpa_supplicant/wpa_supplicant.conf
The pi user’s password has been changed to: iat
The running application can be stopped, by 1st identifying its ID and then killing the task, e.g.:
pgrep python3 | xargs kill
Launching the app from the command line will show the computed emotion profile, as well as the recording input levels and sample time:
cd /home/pi
python3 ./emoLamp.py

Source Code
Get the software onto the Raspberry Pi like so:
ssh [email protected]
git clone https://github.com/wolfpaulus/emotionLamp.git
cp ./emotionLamp/*.py .
Addendum
Mapping a Linux directory (like /pi/home on a RaspberryPi) into your home folder on your Mac, can be helpful, to quickly edit files like python programs, in a more advanced editor. This allows to edit files directly on the RaspberryPi, without having to manually moving them.
On the Mac (prerequisite: Homebrew)
brew cask install osxfuse
brew install sshfs
For instance, if the host name for the RaspberryPi is ‘eli‘ and an appropriate folder exists in the home folder on the Mac, like ~/eli then this command will perform the mapping: sshfs [email protected]:/home/pi /Users/{MAC_USER_NAME}/eli -ovolname=RaspPi

Image
Creating an image of the Raspberry Pi SD Card on a Mac:
# Insert the SD-Card
#find wich disk need to be copied:
diskutil list
#copy it
sudo dd bs=4m if=/dev/disk5 of=~/eli.iso
sudo sync
#unmount the disk
diskutil unmountDisk /dev/disk5
The use a tool like https://etcher.io to copy the iso on to another SD Card.

Hi ! This is a very good idea so congratulations for that, but how can i build the same project but with another microphone, what changes do I have to make ? Thanks