This is a story about a simple web-service that answers only one question: if a given number is prime. The core problem is first solved with a Java class, which is then wrapped into a WebServlet and tested within a web server environment. The web server, however, does not get directly installed, but a docker image is created, containing all the mentioned components. Eventually, once sufficiently tested, the docker container is pushed into a container registry, from which it is deployed and run. The simple service is finally made public and available to the world, scalable, all without having to manage servers or clusters.
1. Into the Elastic Container Registry we go ..

My focus is not so much on Web-Services nor Docker, still, as a starting point, we want to create a simple Web-Service, implemented in Java and made available via Tomcat, (a pure Java HTTP web server environment in which Java code can run.) This web server will then be put into a docker container and stored at the Amazon Elastic Container Registry (ECR), a private, but fully-managed container registry that makes it easy for developers to store, manage, and deploy Docker container images.
Steps to create a docker container image and store it in ECR include:
- Install Docker and create a Docker Account
- Install the AWS and ECS Command Line Clients
- Create an AWS account
- Write the Web-Service Java-Code
- Create a Docker Image
- Push the Image into ECR
1.1. Installing Docker
There are many good introductions into Docker available. All explaining the install process and how to get started:
- A Beginner-Friendly Introduction to Containers, VMs and Docker
- Docker Introduction — What You Need To Know To Start Creating Containers
- Docker for beginners
- Docker Documentation
Before moving on, make sure you have the needed tools installed, like so:
docker --version
Docker version 19.03.1, build 74b1e89

docker-compose --version
docker-compose version 1.24.1, build 4667896b
You also need a docker account and being logged-in ..
1.2. Installing the AWS and ECS Command Line Client
Installing the AWS Command Line Client allows for quick and repeatable execution of tasks that you may otherwise do in AWS Web-UI. How to install the aws-cli depends on the operating system that is installed on your computer, but is explained in much detail over here. If you are using Mac OS and have HomeBrew, the free and open-source software package management system installed, then there is an even easier way: brew install awscli
As the result of this step, entering aws –version in terminal / command shell, should show something like this:
aws --version
aws-cli/1.16.220 Python/3.7.4 Darwin/18.7.0 botocore/1.12.210
We will also need the ECS Command Line Client. Again, how to install it depends on your operating system, but is explained in much detail over here. If you are using Mac OS and have HomeBrew, then there is an easier way: brew install amazon-ecs-cli
Entering ecs-cli –version in terminal, should show something like this:
ecs-cli --version
ecs-cli version 1.15.1 (*UNKNOWN)
1.3. Creating an AWS account / or login if you already have one
To use Amazon Web Services, you will need an AWS account, which can be created here. If you already have an account, login using the “AWS Management Console” link in the My Account menu or use your company’s single sign-on solution.
Create an IAM User
Create an IAM User in your AWS Account / or skip, if you already have any IAM User you want to use. Follow the steps here: Creating IAM Users (Console)
E.g.:
- I used ‘edu_usr‘ for the username
- selected ONLY Programmatic access
- created a group ‘edu_grp‘
- selected ‘PowerUserAccess‘, and also ‘IAMFullAccess‘ for a policy
- clicked ‘Create group’
- did not add any tags
- clicked on “Create user’
It’s important to download the csv file, which contains the access id and key, which the awscli will need going forward.
The aws configure command collects the id, key, region, and profile name from you and then creates the hidden ~/.aws directory and in there text-files with the names credentials and config
[edu]
aws_access_key_id = AK...
aws_secret_access_key = QdQ...
[edu]
region = us-west-2
output = json
1.4. Writing the Web-Service Code
Here is project that contains a simple Java class (Prime.java), which provides a static boolean method, returning true if a given number is prime.
static boolean isPrime(final long n)
The projects contains a second class (PrimeService.java), which wraps the aforementioned function into a web-service:
@WebServlet("/isPrime/*")
public class PrimeService extends HttpServlet {
    private static final Logger Log = LogManager.getLogger(PrimeService.class);

    public void doGet(final HttpServletRequest request, final HttpServletResponse response)
            throws IOException {
        String result;
        try {
            long k = Long.parseLong(request.getPathInfo().substring(1));
            result = String.format("%d is%s a prime number.", k, Prime.isPrime(k) ? "" : " not");
        } catch (NumberFormatException e) {
            Log.warn(request.getPathInfo() + "\n" + e.toString());
            result = "Input could not be interpreted as a valid number";
        }
        response.getWriter().println(result);
    }
}
1.5. Creating a Docker Image
# Simple Tomcat container with a custom war deployed
FROM tomcat:9.0.24-jdk11-openjdk-slim
MAINTAINER Wolf Paulus <[email protected]>
#re-configure tomcat
COPY conf/server.xml /usr/local/tomcat/conf

# remove default webapps and deploy webapp
RUN rm -rf /usr/local/tomcat/webapps/*
COPY build/libs/ROOT.war /usr/local/tomcat/webapps
EXPOSE 80
CMD ["/usr/local/tomcat/bin/catalina.sh", "run"]
Dockerfile: The container will be based on Tomcat 9.0.24 running on Java 11 openSDK. All default WEB apps are removed and a new ROOT.war is placed into the web container’s web-apps directory. Replacing the server.xml file, allows us to reconfigure Tomcat, to host the content on port 80 instead of the default port 8080. Finally, port 80 gets exposed and the web container is launched.
After building the project, which creates the ROOT.war file in ./build/libs, the docker images can be built with this command.
docker build -t tomcatprime .
The output may look something like this:
Sending build context to Docker daemon  4.276MB
Step 1/6 : FROM tomcat:9.0.24-jdk11-openjdk-slim
 ---> 4ef27170e3ac
Step 2/6 : MAINTAINER Wolf Paulus <[email protected]>
 ---> Using cache
 ---> d703fa7649ae
Step 3/6 : RUN rm -rf /usr/local/tomcat/webapps/*
 ---> Using cache
 ---> cc3dd9bff627
Step 4/6 : COPY build/libs/ROOT.war /usr/local/tomcat/webapps
 ---> Using cache
 ---> b577fe25f13f
Step 5/6 : EXPOSE 8080
 ---> Using cache
 ---> 96888d5d907d
Step 6/6 : CMD ["/usr/local/tomcat/bin/catalina.sh", "run"]
 ---> Using cache
 ---> 7aecd294eb82
Successfully built 7aecd294eb82
Successfully tagged tomcatprime:latest
Seeing it running
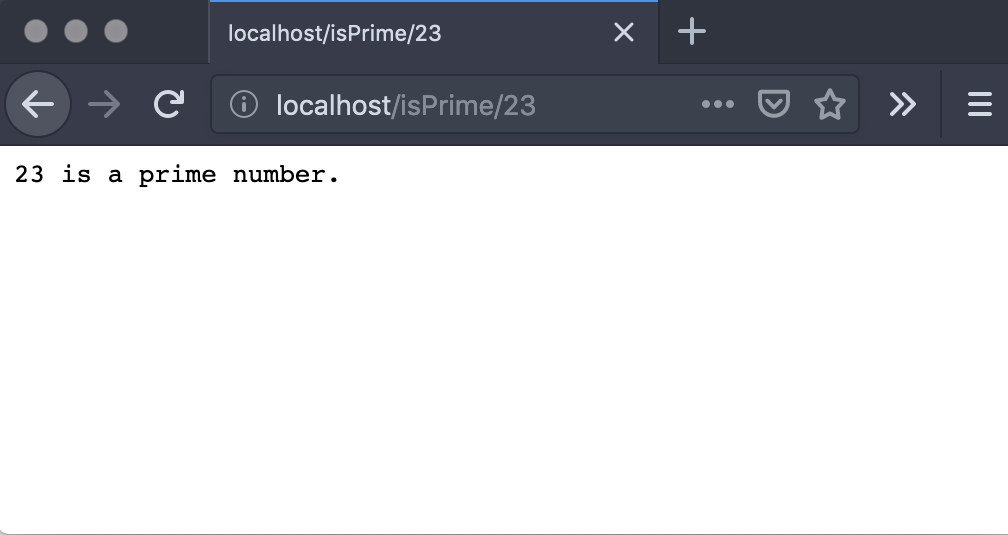
Issuing the docker-compose up -d command will launch the container and with the cool HTTPie tool installed, or with a web browser, we can see it working:
docker-compose up -d
Creating network "prime_default" with the default driver
Creating prime ... done
http localhost/isPrime/17
HTTP/1.1 200
Content-Length: 22
Date: Wed, 04 Sep 2019 16:47:05 GMT

17 is a prime number.
1.6. Pushing the Image into ECR
Before pushing an image into AWS’ Container Registry, a Repository needs to be created. This needs to be done only once. After that, an updated image gets pushed into the same repository.
Creating a ECR Repository
Here is the aws cli command that will create a repo with the name prime_ws
aws ecr create-repository --repository-name prime_ws --region us-west-2 --profile edu
The response from this aws command should look something like this:
{
    "repository": {
        "repositoryArn": "arn:aws:ecr:us-west-2:178...:repository/prime_ws",
        "registryId": "178.....",
        "repositoryName": "prime_ws",
        "repositoryUri": "178....dkr.ecr.us-west-2.amazonaws.com/prime_ws",
        "createdAt": 1567436895.0,
        "imageTagMutability": "MUTABLE"
    }
}
Tagging the Docker Image
The image now needs to be tagged with the repositoryUri, found in the previous response.
docker tag tomcatprime:latest 178.....dkr.ecr.us-west-2.amazonaws.com/prime_ws:latest
Pushing the tagged image
Finally the image can be pushed into ECR. As explained here, to allow the docker command to access AWS ECR, it needs to be authenticated.
eval $(aws ecr get-login --no-include-email --region us-west-2 --profile edu)
docker push 178.....dkr.ecr.us-west-2.amazonaws.com/prime_ws:latest
Which results in something like this:
The push refers to repository [178....dkr.ecr.us-west-2.amazonaws.com/prime_ws]
fa10a7d57c55: Pushed
95a3706fd247: Pushed
3cd10809670d: Pushed
3179f202140d: Pushed
cfd3a59028bd: Pushed
bbd09c44833e: Pushed
15d57950dad3: Pushed
2bf534399aca: Pushed
1c95c77433e8: Pushed
latest: digest: sha256:92707ba45130980539075989c5a63cf2228b4810c7f648a2c14f3ec436740b26 size: 2205
Subsequent changes to the code base can now be build and pushed more easily like so:
#!/usr/bin/env bash
tag_name=latest
img_name=tomcatprime
repo_uri=178.....0.dkr.ecr.us-west-2.amazonaws.com/prime_ws:$tag_name

gradle clean
gradle build
docker build -t $img_name .
docker tag $img_name:$tag_name repo_uri
eval $(aws ecr get-login --no-include-email --region us-west-2 --profile edu)
docker push $repo_uri
2. Heading out the Fargate
Next, we will implicitly create an Amazon Virtual Private Cloud (Amazon VPC) and use Amazon Elastic Container Service (Amazon ECS) to pull the container we created and pushed into the registry and make the service publicly available.
2.1. Creating the Task-execution Role and an empty cluster
To allow ECS to do things like logging, a role needs to be created (TASK_EXEC_ROLE) and the AmazonECSTaskExecutionRolePolicy attached to this role. We also want to create an Amazon ECS empty cluster, which can also implicitly create a VPC (Amazon Virtual Private Cloud) configured with two subnets. Moreover, to eventually allow the container to be accessed on its exposed port 80, a security group with the proper authorization needs to be created.
Executing ./setup.sh will:
- create the Task-execution Role
- attach the task execution role policy
- create an Amazon ECS empty cluster, implicitly also a VPC configured with two public subnets
- create a security Group, authorizing network access
2.2. Create/Update Docker-Compose and ECS-Params files
Just like when running the docker container locally, we need to have a compose file, but this time referring to the container resource inside ECR.
Docker-Compose File
version: '3'
services:
  prime-cluster:
    container_name: prime-container
    restart: unless-stopped
    image: "178......dkr.ecr.us-west-2.amazonaws.com/prime_ws:latest"
    ports:
      - "80:80"
    logging:
      driver: awslogs
      options:
        awslogs-group: prime
        awslogs-region: us-west-2
        awslogs-stream-prefix: prime
ECS-Parameter File
The ecs-params.yml file refers to the subnets that were created when executing ./setup.sh. Update the ecs-params.yml file with the subnets that were created with the VPC. Also update the security_groups value, with the one we created above.
version: 1
task_definition:
  task_execution_role: fargateTaskExecutionRoleV1
  ecs_network_mode: awsvpc

  task_size:
    mem_limit: 0.5GB
    cpu_limit: 256

run_params:
  network_configuration:
    awsvpc_configuration:
      subnets:
        - "subnet-08..."
        - "subnet-0a..."
      security_groups:
        - "sg-0f..."
      assign_public_ip: ENABLED
2.3. Launch
The Cluster in the implicitly created VPC is all set up and ready to go. We created the fargateTaskExecutionRole to allow the container to do stuff and a security role, allowing the container to be accessed via HTTP Port 80. We updated the docker-compose file, to now point to the container’s location in the ECR and put an ecs-params.yml in place, for those parameters that aren’t native to the Docker Compose files. Now it’s time to compose and bring up the service. Details about the ecs-cli compose service command can be found here.
 ./launch.sh
WARN[0000] Skipping unsupported YAML option for service...  option name=restart service name=prime-cluster
INFO[0000] Using ECS task definition                     TaskDefinition="implicit:2"
INFO[0001] Created Log Group prime in us-west-2
INFO[0001] Created an ECS service                        service=implicit taskDefinition="implicit:2"
INFO[0002] Updated ECS service successfully              desiredCount=1 force-deployment=false service=implicit
INFO[0017] (service implicit) has started 1 tasks: (task 35f39288-2c1c-4027-9f66-a95f12c79156).  timestamp="2019-09-12 21:37:39 +0000 UTC"
INFO[0032] Service status                                desiredCount=1 runningCount=1 serviceName=implicit
INFO[0032] ECS Service has reached a stable state        desiredCount=1 runningCount=1 serviceName=implicit
Name                                                State    Ports                     TaskDefinition  Health
8d53e293-0fdf-40dd-bed2-3b7f939a414b/prime-cluster  RUNNING  34.220.216.94:80->80/tcp  implicit:2      UNKNOWN
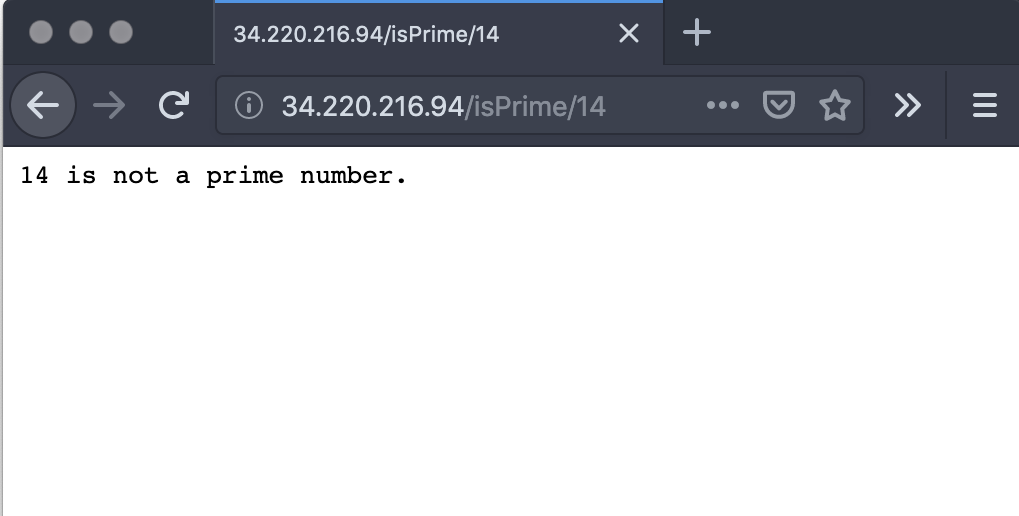
The output is telling us the IP address, i.e., how to reach the service – and just like we did locally, we can now access the service via HTTPie or with a Web browser:
http 34.220.216.94/isPrime/14
HTTP/1.1 200
Content-Length: 26
Date: Wed, 04 Sep 2019 20:13:08 GMT

14 is not a prime number.
3. Preexisting Conditions
 Instead of having the Amazon Elastic Container Service (Amazon ECS) implicitly create an Amazon Virtual Private Cloud (Amazon VPC), lets first create a VPC and then use Amazon ECS to pull the container from ECR and make the service publicly available.
This may sound like the less exciting, but I think there might be a good chance that you are not always in control of creating your very own VPC, but must use one that has been created for you.
3.1. Creating a VPN (or skip, if you already have one)
Running the ./vpc.sh bash script does many things. So here we go, navigating into the ./explicit directory and executing the ./vpc.sh script will:
- create a VPC
- add a name tag to VPC
- create public Subnets and add name tags
- create private Subnets and add name tags
- create Internet gateway and attach it to the VPC
- create Route Table
- create route to Internet Gateway
- associate public Subnets with Route Table
- enable Auto-assign Public IP on Public Subnets
- allocate Elastic IP Address for NAT Gateway
- create NAT Gateway
- create route to NAT Gateway
- create a security Group
- authorize traffic from same security group
- create an application load balancer (alb)
./vpc.sh

[*] [10:10:30] VPC ID 'vpc-0566716e3a7ecf514' CREATED in 'us-west-2' region.
[*] [10:10:30] VPC ID 'vpc-0566716e3a7ecf514' NAMED as 'Fargate VPC'.
[*] [10:10:31] Subnet ID 'subnet-0c1f60a3538ace90a' CREATED in 'us-west-2a' Availability Zone.
[*] [10:10:32] Subnet ID 'subnet-0c1f60a3538ace90a' NAMED as '10.0.1.0 - us-west-2a'.
[*] [10:10:32] Subnet ID 'subnet-002d5118d51a2da41' CREATED in 'us-west-2b' Availability Zone.
[*] [10:10:33] Subnet ID 'subnet-0c1f60a3538ace90a' NAMED as '10.0.2.0 - us-west-2b'.
[*] [10:10:34] Subnet ID 'subnet-07c43a9090ae68f45' CREATED in 'us-west-2a' Availability Zone.
[*] [10:10:35] Subnet ID 'subnet-07c43a9090ae68f45' NAMED as '10.0.3.0 - us-west-2a'.
[*] [10:10:35] Subnet ID 'subnet-0296afc250f3a2ad3' CREATED in 'us-west-2b' Availability Zone.
[*] [10:10:36] Subnet ID 'subnet-0296afc250f3a2ad3' NAMED as '10.0.4.0 - us-west-2b'.
[*] [10:10:37] Internet Gateway ID 'igw-0ee37c0a3ff89b950' CREATED.
[*] [10:10:37] Internet Gateway ID 'igw-0ee37c0a3ff89b950' ATTACHED to VPC ID 'vpc-0566716e3a7ecf514'.
[*] [10:10:38] Route Table ID 'rtb-0fed734701c81692e' CREATED.
[*] [10:10:39] Route to '0.0.0.0/0' via Internet Gateway ID 'igw-0ee37c0a3ff89b950' ADDED to Route Table ID 'rtb-0fed734701c81692e'.
[*] [10:10:39] Public Subnet ID 'subnet-0c1f60a3538ace90a' ASSOCIATED with Route Table ID 'rtb-0fed734701c81692e'.
[*] [10:10:40] Public Subnet ID 'subnet-002d5118d51a2da41' ASSOCIATED with Route Table ID 'rtb-0fed734701c81692e'.
[*] [10:10:41] Auto-assign Public IP ENABLED on Public Subnet ID 'subnet-0c1f60a3538ace90a'.
[*] [10:10:41] Auto-assign Public IP ENABLED on Public Subnet ID 'subnet-002d5118d51a2da41'.
[*] [10:10:42] Elastic IP address ID 'eipalloc-0a6374b320dff990a' ALLOCATED.
Creating NAT Gateway ID 'nat-045b9e574ee9b8e0e' and waiting for it to become available.

[*] [10:12:38] NAT Gateway ID 'nat-045b9e574ee9b8e0e' is now AVAILABLE.
[*] [10:12:39] Main Route Table ID is 'rtb-01372a00b49fe4092'.
[*] [10:12:39] Route to '0.0.0.0/0' via NAT Gateway with ID 'nat-045b9e574ee9b8e0e' ADDED to Route Table ID 'rtb-01372a00b49fe4092'.
[*] [10:12:40] 'fargateSecurityGroupV2' Security Group with ID 'sg-0156c48a14986bbf8' created.
[*] [10:12:43 '{
    "LoadBalancers": [
        {
            "LoadBalancerArn": "arn:aws:elasticloadbalancing:us-west-2:178.....:loadbalancer/app/prime-alb/da20c4de7a861c3d",
            "DNSName": "prime-alb-199922134.us-west-2.elb.amazonaws.com",
            "CanonicalHostedZoneId": "Z1H1FL5HABSF5",
            "CreatedTime": "2019-09-12T17:12:43.620Z",
            "LoadBalancerName": "prime-alb",
            "Scheme": "internet-facing",
            "VpcId": "vpc-0566716e3a7ecf514",
            "State": {
                "Code": "provisioning"
            },
            "Type": "application",
            "AvailabilityZones": [
                {
                    "ZoneName": "us-west-2b",
                    "SubnetId": "subnet-002d5118d51a2da41"
                },
                {
                    "ZoneName": "us-west-2a",
                    "SubnetId": "subnet-0c1f60a3538ace90a"
                }
            ],
            "SecurityGroups": [
                "sg-0156c48a14986bbf8"
            ],
            "IpAddressType": "ipv4"
        }
    ]
}']
3.2. Creating a Cluster
Before running the ./launch.sh script, the following variable values need to updated, to match those of the VPC, created or re-used:
AWS_PROFILE=".."
AWS_REGION="us-west-2"
TASK_EXEC_ROLE="fargateTaskExecutionRoleV2"
CLUSTER_NAME=".."
TG_NAME=".."
TG_PORT="80"
HEALTH_CHECK_PATH="/.."

# Values from explicitly created or already existing VPC

VPC_ID="vpc-056..."
SUBNET_PRIVATE1_ID="subnet-07c4..."
SUBNET_PRIVATE2_ID="subnet-0296..."
SECURITY_GRP_ID="sg-0156..."
LOAD_BALANCER_NAME="prime-alb"
While the docker-compose file remains the same, the ecs-params.yml needs to be updated, again to match the VPC. Please note that assign_public_ip needs the be set to DISABLED.
- task_execution_role
-
subnets: (… private subnets)
-
security_groups:
- assign_public_ip: DISABLED
With the the launch script and the parameter file updated, we can create and compose the cluster:
The launch script:
- creates the Task-execution Role
- attaches the task execution role policy:AmazonECSTaskExecutionRolePolicy
- creates the cluster using the private subnets
- creates a Target Group (which needs a health check path)
- creates a Listener, which forward traffic from the Load Balancer to the Target Group
- creates a task (using the docker-compose file) and runs one instance on your cluster
- discovers the Load Balancer’s DNS NAME and performs an HTTP GET request using the DNS NAME and health check path
./launch.sh

[*] [10:30:11] {
    "Role": {
        "Path": "/",
        "RoleName": "fargateTaskExecutionRoleV2",
        "RoleId": "AROASTEGIYUJDJVAOHKAY",
        "Arn": "arn:aws:iam::178...:role/fargateTaskExecutionRoleV2",
        "CreateDate": "2019-09-12T17:30:10Z",
        "AssumeRolePolicyDocument": {
            "Version": "2012-10-17",
            "Statement": [
                {
                    "Sid": "",
                    "Effect": "Allow",
                    "Principal": {
                        "Service": "ecs-tasks.amazonaws.com"
                    },
                    "Action": "sts:AssumeRole"
                }
            ]
        }
    }
}
[*] [10:30:11] 'AmazonECSTaskExecutionRolePolicy' attached to role: 'fargateTaskExecutionRoleV2'.
[*] [10:30:11] Bring up ECS cluster...
INFO[0000] Created cluster                               cluster=prime-cluster region=us-west-2
INFO[0001] Waiting for your cluster resources to be created...
INFO[0002] Cloudformation stack status                   stackStatus=CREATE_IN_PROGRESS
Cluster creation succeeded.
[*] [10:30:46] 'Target Group created'arn:aws:elasticloadbalancing:us-west-2:178..:targetgroup/prime-tg/0157f063b70a0602'
[*] [10:30:47] 'Listener created. '{
    "Listeners": [
        {
            "ListenerArn": "arn:aws:elasticloadbalancing:us-west-2:178...:listener/app/prime-alb/da20c4de7a861c3d/cde5eef7dfa072ff",
            "LoadBalancerArn": "arn:aws:elasticloadbalancing:us-west-2:178....:loadbalancer/app/prime-alb/da20c4de7a861c3d",
            "Port": 80,
            "Protocol": "HTTP",
            "DefaultActions": [
                {
                    "Type": "forward",
                    "TargetGroupArn": "arn:aws:elasticloadbalancing:us-west-2:178....:targetgroup/prime-tg/0157f063b70a0602"
                }
            ]
        }
    ]
}'
WARN[0000] Skipping unsupported YAML option for service...  option name=restart service name=prime-cluster
INFO[0000] Using ECS task definition                     TaskDefinition="explicit:1"
INFO[0001] Created Log Group prime in us-west-2
INFO[0001] Created an ECS service                        service=explicit taskDefinition="explicit:1"
INFO[0001] Updated ECS service successfully              desiredCount=1 force-deployment=false service=explicit
INFO[0017] (service explicit) has started 1 tasks: (task 6702adb1-73f4-418b-8075-815a2afdc42f).  timestamp="2019-09-12 17:30:57 +0000 UTC"
INFO[0047] Service status                                desiredCount=1 runningCount=1 serviceName=explicit
INFO[0047] (service explicit) registered 1 targets in (target-group arn:aws:elasticloadbalancing:us-west-2:178....:targetgroup/prime-tg/0157f063b70a0602)  timestamp="2019-09-12 17:31:25 +0000 UTC"
INFO[0047] ECS Service has reached a stable state        desiredCount=1 runningCount=1 serviceName=explicit
Name                                                State    Ports                  TaskDefinition  Health
6702adb1-73f4-418b-8075-815a2afdc42f/prime-cluster  RUNNING  10.0.3.152:80->80/tcp  explicit:1      UNKNOWN
curl $LOAD_BALANCER_DNS_NAME$HEALTH_CHECK_PATH
  % Total    % Received % Xferd  Average Speed   Time    Time     Time  Current
                                 Dload  Upload   Total   Spent    Left  Speed
100    22  100    22    0     0    111      0 --:--:-- --:--:-- --:--:--   111
[*] [10:31:54] 'HTTP GET : '17 is a prime number.'
Again, the last line of the script outputs how to reach the service. E.g.: http prime-alb-199922134.us-west-2.elb.amazonaws.com/isPrime/14
HTTP/1.1 200
Connection: keep-alive
Content-Length: 26
Date: Thu, 12 Sep 2019 17:32:29 GMT
14 is not a prime number.
The sky is the limit

We have arrived. Starting with a Web Service (implemented in Java and configured to become a docker-container), we ran the docker-container locally, before pushing it into the private AWS Elastic Container Registry (ECR). We then used Amazon’s Elastic Container Service (ECS) to implicitly create a Virtual Private Cloud (Amazon VPC), when it created an empty cluster. A slightly modified docker-compose file, which now pointed to the docker image in ECR, was used to create a task, which ran as one instance on the cluster.
We also created (or used and existing) Virtual Private Cloud as a starring point, which required a Target-Group to receive traffic from a load balancer and a slightly modified ecs-params.yml file, containing task parameters that aren’t native to docker compose files.
In summary, the sky is the limit is not entirely true in the case, the Amazon ECS Service has its limits and so does Fargate. No being able to attach to (opening a shell on) the running container is a limitation, but running a docker container scalable, without having to manage servers or clusters is very appealing.
Source Code

https://github.com/wolfpaulus/dock2gate